
MeshAnimator Suite (for Avatar VRChat)
- Digital0 JPY
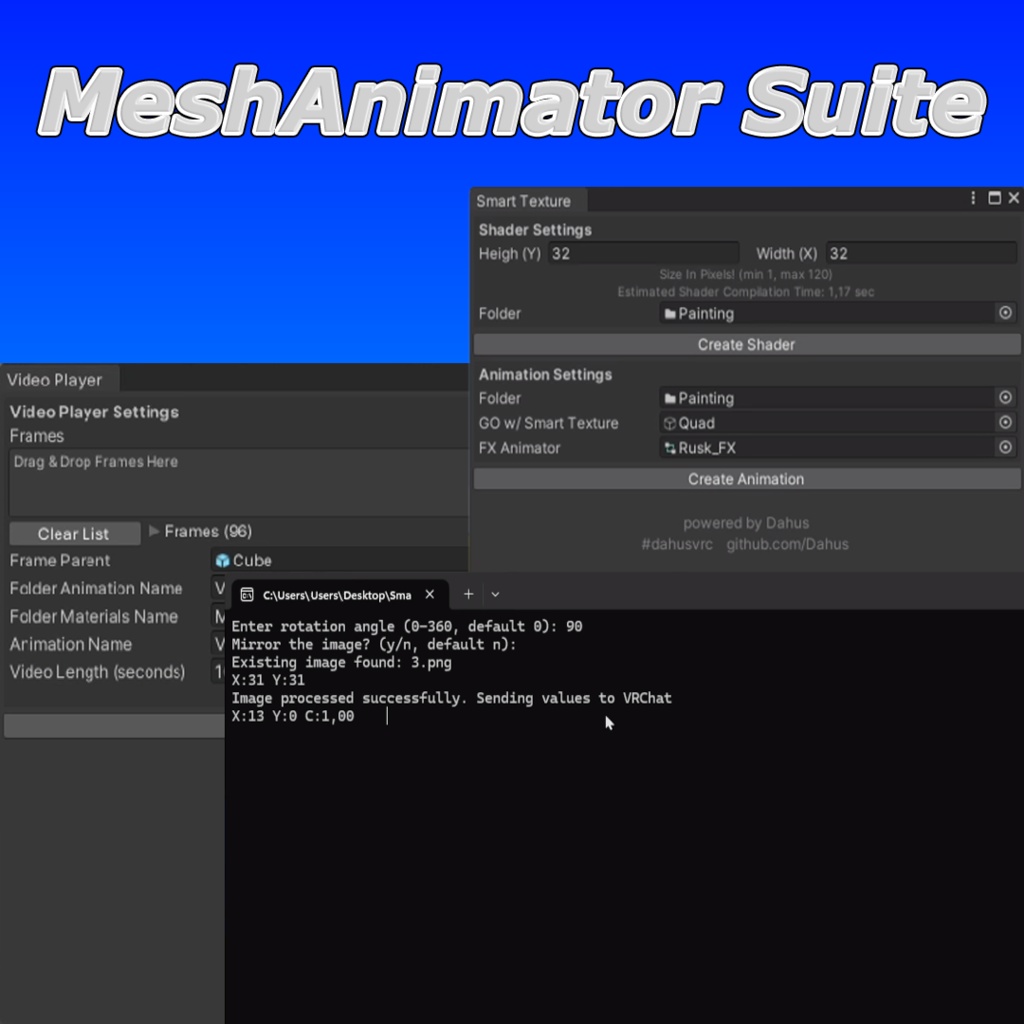

MeshAnimator Suite Currently, the package includes the following applications: - Smart Texture: This tool generates a material with a shader for your avatar within your Unity project. You can then apply this material to your avatar and animate it. It also facilitates the real-time transmission of images from your computer to VRChat. - Video Player: This application allows for the animation of video frames for your avatar, enabling frame-by-frame video playback and integration into your project. Links: Smart Texture: https://github.com/Dahus/MeshAnimator-Suite?tab=readme-ov-file#instructions-smart-texture Video Player: https://github.com/Dahus/MeshAnimator-Suite?tab=readme-ov-file#instructions-video-player General Installation: - Import BreadcrumbsMeshAnimator-Suite.unitypackage into your Unity Asset folder. - Navigate to "Windows" -> "MeshAnimator Suite" -> ... Instructions (Smart Texture) https://www.youtube.com/watch?v=o84U2YUSgP4 Important! Before generating the texture, it is recommended to make a copy of your FX Animator. 1. Set Image Resolution: Adjust the "Height" and "Width" settings for the image that will be created. 2. Select Folder: Choose the folder where the shader with the material will be created. 3. Create Shader: Click the "Create Shader" button. 4.Assign Material to Object: Add the created material to an object that has an empty slot in the Mesh Renderer's "Materials" section. 5. Choose Animation Folder: Select a different folder, or keep the same one, where the animation folders (c0 and c1) will be created. 6. Assign Object with Material: In the "GO w/ Smart Texture" slot, add the object to which you added the material. 7. Add FX Animator: In the "FX Animator" slot, add your FX Animator. 8. Create Animation: Click "Create Animation." After some time, everything will be created automatically, whether it takes a long or short time. 9. Download and Extract Smart Texture: Download the "Smart-Texture" https://github.com/Dahus/Smart-Texture from the separate repository and extract the RAR archive to a convenient location. 10. Run Smart Texture: Launch the program by running Smart Texture.exe. 11. Add Your Image: Once the program starts, it will create a folder named "FolderForPicture." Move your image into this folder. 12. Adjust Settings: Return to the program, then either press "Enter" to proceed or adjust the image rotation angle and invert it if needed. FAQ (Smart Texture): - Why does the program take a long time to create a shader? After entering the resolution, check the "Estimated Shader Compilation Time" section, which indicates the approximate time needed for shader compilation. - Why does the program take a long time to create animations? This is normal. Try deleting the old shader and material, then create a new shader with a lower resolution. - What should I do if the shader or animations are not created? Make sure you have launched the program correctly. If the image does not render or parts of it disappear over time, check if the animations that are constantly active (e.g., tail, ears, body, etc.) have WriteDefaults enabled. - What should I do if the uploaded image is only partially visible? Check the resolution of your image. It should not exceed the current shader resolution. For example, if your shader has a resolution of 32x32 pixels, ensure that the image in the "FolderForPicture" folder also has a resolution of 32x32 pixels. - Where can I find images? For example, you can use websites like "pixilart.com" to find images with a resolution of 32x32 pixels. - Have additional questions? Feel free to contact me on "Discord" https://discordapp.com/users/290117159806566421/. Instructions (Video Player) https://www.youtube.com/watch?v=tgz0XY0NWKM 1. Drag the sorted frames of your video into the Texture Array field. You can split the video itself into frames using your program or using sites like: https://www.onlineconverter.com/video-to-jpg 2. Drag the GameObject that will be the parent for the frames. Also, do not forget to adjust the Scale, because the resolution of the video depends on it. 3. You can set your own names for the created folder with files, animations and materials. 4. Specify the duration of your video that you split into frames in step 3.1 5. Done! You now have 2 animations, ...ON.anim enables animation, OFF.anim disables accordingly.