

IconMaker
- Digital0 JPY
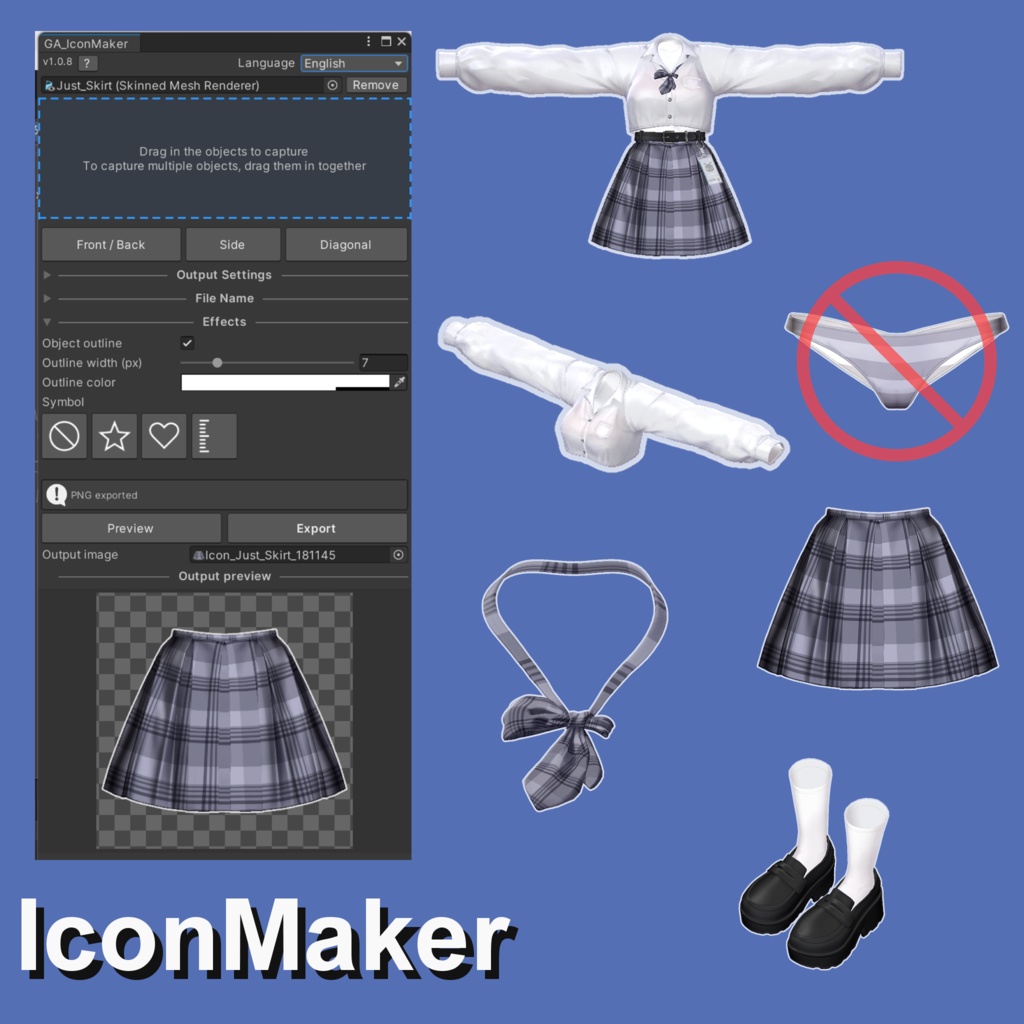
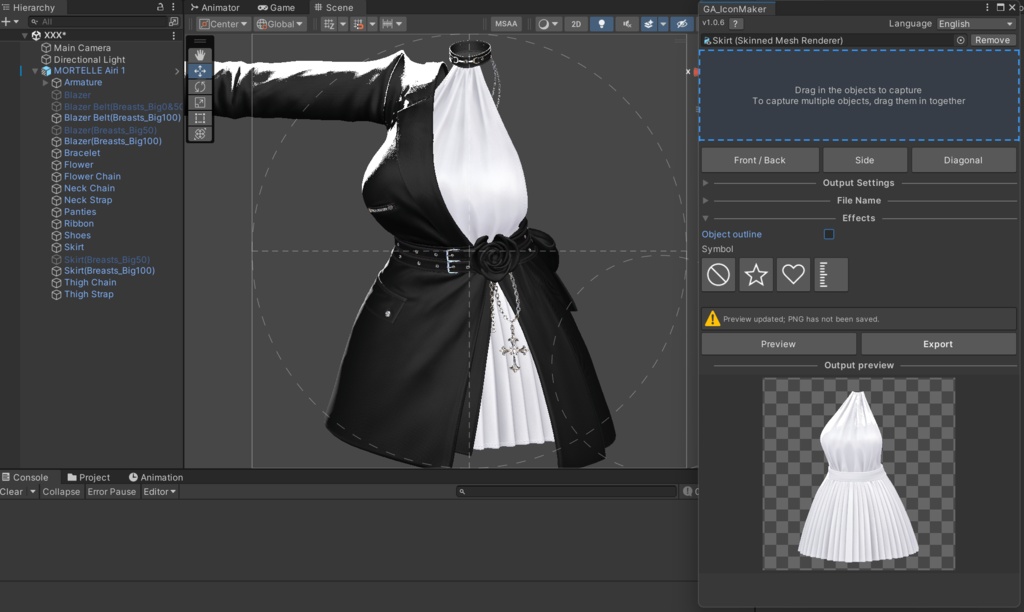


VRChatの衣装・アクセサリー・小物や、クイックメニュー用のアイコンを作成できるUnity用撮影ツールです。 Sceneビューで構図を調整し、指定したオブジェクトを背景透過PNGとして撮影できます。スクリーンショットの背景除去や切り抜き作業は不要です。 --------------------- Unity 圖示拍攝工具,適合為 VRChat 的服裝、配件、道具與快速選單製作圖示。 直接在 Scene 調整構圖,即可將指定物件拍攝成背景透明的 PNG,省去截圖後去背與裁切的步驟。 --------------------- A Unity icon capture tool for creating icons of VRChat outfits, accessories, and props, as well as icons for the Quick Menu. Compose your shot directly in the Scene view and capture selected objects as transparent PNGs, without having to remove backgrounds or crop screenshots afterward.
Main Features
1. 正面/背面、左右の側面、4方向の斜めアングルに対応した自動フレーミング。Sceneビューでの微調整も可能です。 2. 256~4096(4K)のPNG出力に対応。Unityで使用するテクスチャの最大サイズ(Max Size)と圧縮も個別に設定できます。 3. 撮影範囲と構図のガイドを表示。 4. アウトラインと、禁止マーク・星・ハート・目盛りの4種類のシンボルに対応。 5. 出力画像のプレビュー。 6. ファイル名、接頭辞、接尾辞、タイムスタンプ、保存先を設定可能。 7. 中国語・英語・日本語・韓国語のUIに対応。 --------------------- 1. 提供正/反面、左右側面與四個斜角的自動構圖,並可使用 Scene 視角自由微調。 2. PNG 輸出尺寸提供 256 至 4096(4K),另可設定 Unity 貼圖使用尺寸(Max Size)與貼圖壓縮。 3. 提供拍攝範圍與構圖參考線。 4. 支援描邊,以及禁止標誌、星星、愛心、刻度尺四種符號效果。 5. 可預覽輸出圖片。 6. 支援自訂檔名、前後綴、時間標記及輸出位置。 7. 提供中文、英文、日文與韓文介面。 --------------------- 1. Automatic framing for front/back, left/right side, and four diagonal views, with manual adjustments available in the Scene view. 2. PNG output sizes from 256 to 4096 (4K), with separate settings for Unity texture Max Size and texture compression. 3. Capture area guides and composition reference lines. 4. Outline effects and four symbol overlays: prohibition sign, star, heart, and ruler. 5. Output image preview. 6. Customizable filenames, prefixes, suffixes, timestamps, and output folders. 7. Chinese, English, Japanese, and Korean interfaces.
How to Use
1. Unity上部のメニューから **Tools > GA_IconMaker** を開きます。 2. Hierarchyから撮影したいオブジェクトをツールのウィンドウへドラッグします。複数のオブジェクトを一緒に撮影する場合は、Ctrlを押しながら選択し、まとめてドラッグしてください。有効なオブジェクトをドラッグするたびに、現在のリストが置き換わります。 3. 構図ボタン、またはSceneビューの手動操作で、オブジェクトが中央の正方形内に収まるように調整します。 4. 出力、ファイル名、エフェクトを設定します。 5. **プレビュー**を押して出力画像を確認します。この操作では画像は保存されません。 6. **出力**を押してPNG画像を保存します。 --------------------- 1. 從 Unity 上方選單 **Tools > GA_IconMaker** 開啟視窗。 2. 將 Hierarchy 中要拍攝的物件拖入視窗;一次拍攝複數物件時,請按住 Ctrl 選取要拍攝的物件後一起拖入。每次有效拖入都會取代原清單。 3. 使用構圖按鈕或手動調整 Scene 視角,讓物件位於中央正方形範圍內。 4. 調整輸出、檔名與效果設定。 5. 按 **預覽** 預覽輸出畫面,此步驟不會儲存圖片。 6. 按 **產出** 輸出 PNG 圖片。 --------------------- 1. Open **Tools > GA_IconMaker** from Unity’s top menu. 2. Drag the objects you want to capture from the Hierarchy into the tool window. To capture multiple objects together, hold Ctrl to select them and drag them in together. Each valid drop replaces the current list. 3. Use the framing buttons or manually adjust the Scene view to position the objects within the central square. 4. Adjust the output, filename, and effect settings. 5. Click **Preview** to check the output image. This step does not save a file. 6. Click **Export** to save the PNG image.
Terms of Service
無断での再販・再配布・再アップロードは禁止されています。 未經授權,禁止將原始或修改後的內容進行再販售、再配布或重新上傳。 Unauthorized resale, redistribution, and reuploading are strictly prohibited.
Update History
2026/11/02 - v1.0.8 release
Contact
Twitter: @Gagak_06 何か問題が発生した場合は、私に連絡してください。解決するために最善を尽くします。 If you encounter any problems, please contact me and I will try my best to solve it. 如果有碰到任何問題請聯絡我,我會盡力處理
Support
応援していただける方は、他の作品のご購入もご検討ください。 如果你喜歡我的作品,可以購買其它商品來支持我。 If you like my work, you can support me by purchasing my other works.