
VRCHAT "OSC PC information"
- ダウンロード商品¥ 100
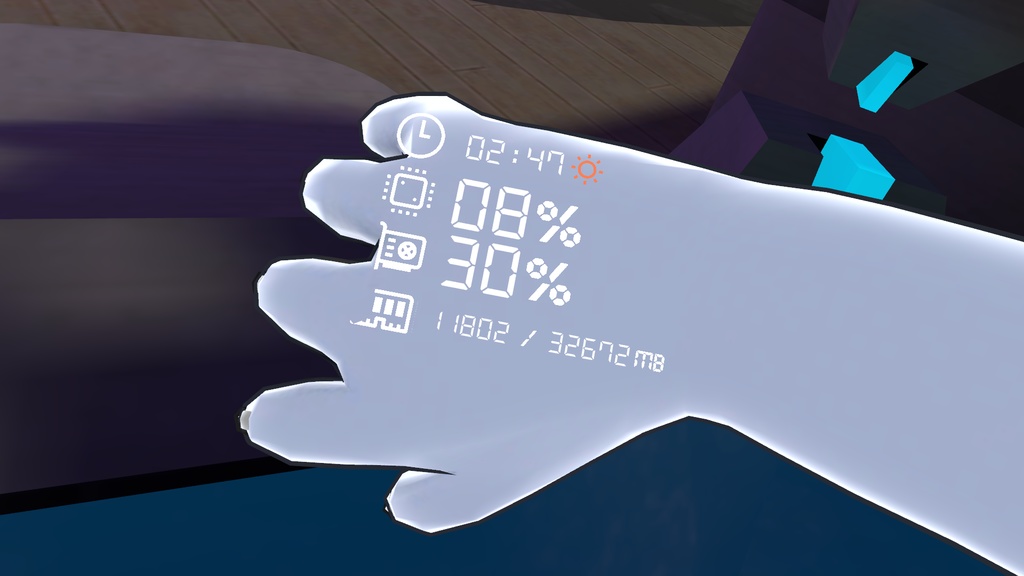
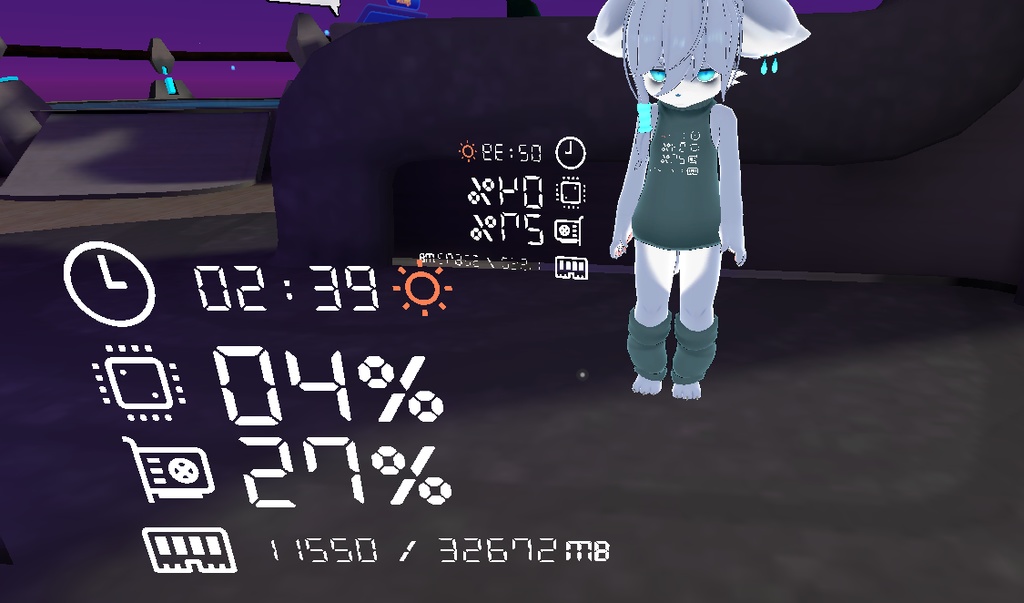
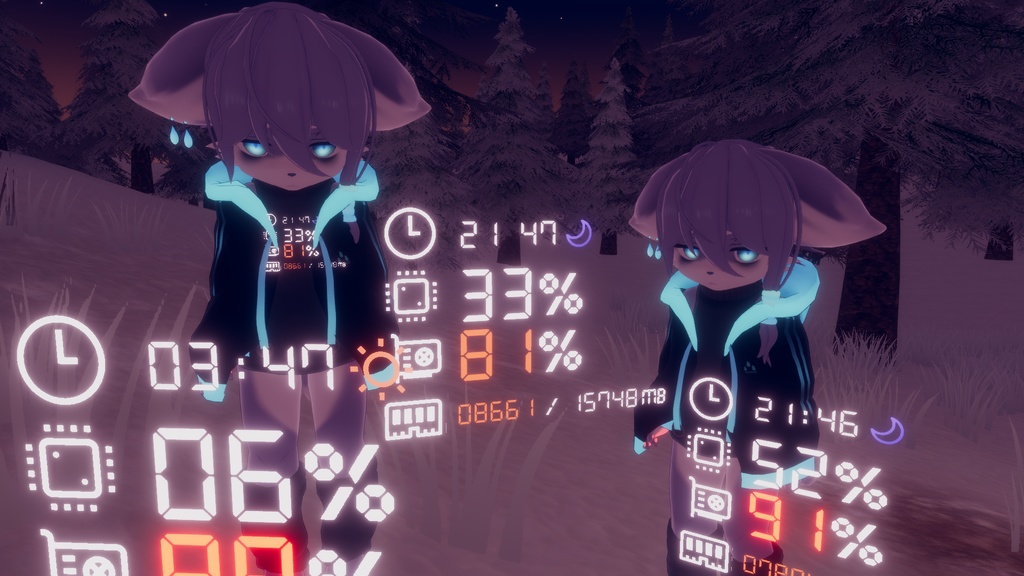


实时监控并直接在模型上显示 CPU、GPU、内存占用及本地时间。支持一键自动安装/卸载。(我不知道为什么不能把B站视频放进去,中文视频教程 https://www.bilibili.com/video/BV1uG411p7tY )。 Monitor your PC's real-time CPU, GPU, RAM usage, and local time directly on your avatar. One-click auto-install/uninstall supported. アバター上でPCのCPU、GPU、メモリ使用率、およびローカル時間をリアルタイムで表示。 ワンクリックで自動インストール・削除が可能です。 目前只兼容NVIDIA显卡。 Currently, NVIDIA GPUs only. ※現在はNVIDIA製グラフィックボードのみ対応しています。
更新记录 / Change log / 変更ログ
2025/03/03 修复了部分 Windows 系统 CPU 显示 -1.0 的问题,并优化了数据平滑度。 Fixed CPU data error (-1.0) on certain Windows systems and improved data smoothing. 一部の Windows 環境で CPU データが -1.0 と表示される不具合を修正し、数値の推移をスムーズにしました。 2024/06/23 修复了 Windows 11 环境下 CPU 使用率显示不正确的问题。 Resolved incorrect CPU usage reporting on Windows 11. Windows 11 における CPU 使用率の误表示問題を修正しました。 2022/07/20 生成的 Animator State 默认勾选 “Write Defaults”,以防止原有动画层失效。 Enabled "Write Defaults" on all generated Animator States to prevent layer conflicts. 既存のレイヤーへの影響を避けるため、生成されるすべての Animator State で「Write Defaults」を有効化しました。 2022/07/17 新增“显存模式”,可将内存占用切换为 GPU 显存(VRAM)占用。 Added "VRAM Mode" to switch the display to use System RAM or GPU VRAM. 「GPUメモリ」モードを追加。システムメモリの代わりに VRAM 使用率を表示可能になりました。
使用方式 / How to setup / 導入方法
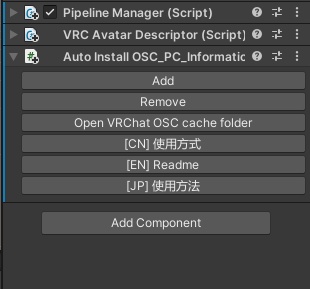
Step 1: 请先下载所需的依赖包: https://patreon.com/posts/simple-counter-62864361 Please download the required dependency package here: https://patreon.com/posts/simple-counter-62864361 以下のリンクから必要なパッケージをダウンロードしてください: https://patreon.com/posts/simple-counter-62864361 Step 2: 开始之前,请务必备份你的 Unity 项目。 Please make sure to backup your Unity project before proceeding. 開始する前に、必ずUnityプロジェクトのバックアップを取ってください。 Step 3: 导入 “Simple Counter v.1.0 by RED_SIM.unitypackage” Import "Simple Counter v.1.0 by RED_SIM.unitypackage" 「Simple Counter v.1.0 by RED_SIM.unitypackage」をインポート Step 4: 导入 “OSC_PC_Information.unitypackage” Import "OSC_PC_Information.unitypackage" 「OSC_PC_Information.unitypackage」をインポート Step 5: 在 Assets/OSCPCInformation/ 路径下找到 “OSC_PC_Performance” 预制件,将其拖拽到模型中你想要放置的任何位置(支持放置多个)。 Locate the "OSC_PC_Performance" prefab under Assets/OSCPCInformation/. Drag and drop it onto your avatar (you can place multiple instances). Assets/OSCPCInformation/ 内にある 「OSC_PC_Performance」 プレハブをアバターの好きな場所にドラッグ&ドロップしてください(複数設置可能)。 Step 6: 给模型添加一个名为 “Auto Install OSC_PC_Information” 组件。 Add an "Auto Install OSC_PC_Information" component to your avatar. アバターに「Auto Install OSC_PC_Information」コンポーネントを追加します Step 7: 点击 “Add” 按钮生成动画。如果你想撤销更改,请点击 “Remove”。 Click the "Add" button to generate animations. If you wish to revert changes, click the "Remove". 「Add」 ボタンをクリックしてアニメーションを生成します。設定を戻したい場合は 「Remove」 を選択してください。 Step 8: 从模型上删除刚才添加的 “Auto Install OSC_PC_Information” 组件。 Remove the "Auto Install OSC_PC_Information" component from your avatar. アバターから「Auto Install OSC_PC_Information」コンポーネントを削除します。 Step 9: 上传模型并进入游戏。 Upload your avatar and launch VRChat. アバターをアップロードし、VRChatに入ります。 Step 10: 切换至该模型。打开圆盘菜单,选择 Options -> OSC -> Enable。接着在电脑上解压 VRChat OSC-PC Sender.zip 并运行 VRCHAT-OSC Start.bat 即可。 Switch to the avatar. In the Action Menu, navigate to Options -> OSC -> Enable. Then, unzip VRChat OSC-PC Sender.zip on your PC and run VRCHAT-OSC Start.bat. アバターを切り替えます。Action Menuから Options > OSC > Enable を選択してください。その後、PCで VRChat OSC-PC Sender.zip を解凍し、 VRCHAT-OSC Start.bat を実行すれば完了です。
注意事项 / CAUTION / 注意事項
如果动画不播放,在 C:\Users\{你的用户名}\AppData\LocalLow\VRChat\VRChat\OSC\ 下删除缓存文件, 例如一个完整的路径看起来是这样: C:\Users\CatSeed\AppData\LocalLow\VRChat\VRChat\OSC\ 删除缓存之后,在游戏中重置模型 If the animations don't play, delete all the files under C:\Users\{your username}\AppData\LocalLow\VRChat\VRChat\OSC\ For example, a path would look like this: C:\Users\CatSeed\AppData\LocalLow\VRChat\VRChat\OSC\ After emptying the cache, reset your avatar in game. アニメーションが再生されない時は下記ファイルを全て削除してください「C:\Users{your username}\AppData\LocalLow\VRChat\VRChat\OSC」または「C:\Users\Admin\AppData\LocalLow\VRChat\VRChat\OSC」 キャッシュをクリアし、アバターリセットしてください
联系 / Contact information / 連絡先
如果你有任何安装"OSCPCInformation"的问题,你可以联系我,我可以帮你(QQ 763737569 加好友请注明来意)。 You can contact me on Discord: "CatSeed #1292" or ".catseed", if you have any problems installing "OSCPCInformation". 「OSCPCInformation」をインストールするすべての問題がある場合は、あなたはDiscordの上で私に連絡することができます:「Catseed #1292」/「.catseed」、私はあなたを助けることができます。