(無料版あり)【EzMarkerTool】After Effects マーカー管理パネル
- 【通常版】EzMarkerToolダウンロード商品¥ 1,000
- 【Lite版】EzMarkerToolダウンロード商品¥ 0
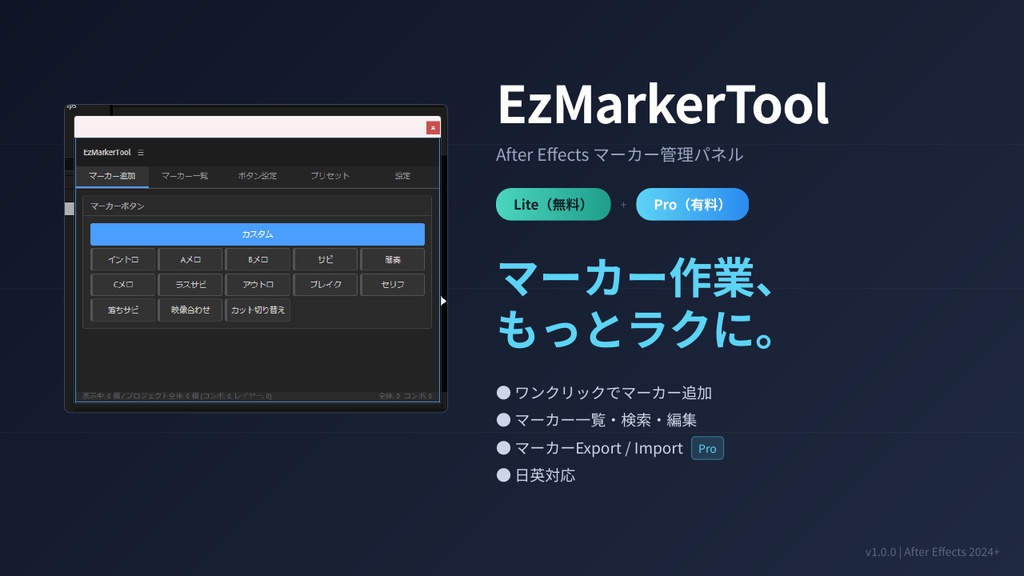


【EzMarkerTool】After Effects マーカー管理パネル ━━━━━━━━━━━━━━━━━━━━━━━━━━━━ マーカー作業、もっとラクにしませんか? ━━━━━━━━━━━━━━━━━━━━━━━━━━━━ EzMarkerTool は、After Effects のコンポジション/レイヤーマーカーを 効率的に管理できるCEPパネル拡張です。 よく使うマーカーをボタンとして登録しておけば、 ワンクリックでマーカーを追加できます。 プロジェクト全体のマーカーを一覧表示・検索・編集・削除も可能。 マーカーのエクスポート/インポートで他プロジェクトとの連携もスムーズです。 ▼ Lite版 完全無料 ▼ Pro版 リリース記念セール ¥500(通常 ¥1,000) ──────────────────────────────────────────────────────────────── [EzMarkerTool] After Effects Marker Management Panel ━━━━━━━━━━━━━━━━━━━━━━━━━━━━ Tired of fiddly marker work? ━━━━━━━━━━━━━━━━━━━━━━━━━━━━ EzMarkerTool is a CEP panel extension that helps you efficiently manage composition and layer markers in After Effects. Register frequently used markers as buttons to add them with a single click. Browse, search, edit, and delete every marker in your project from one panel. Marker export/import makes it smooth to carry markers between projects. ▼ Lite Edition: Completely Free ▼ Pro Edition: Launch Sale ¥500 (regularly ¥1,000)
拡張機能の説明 / About this Extension
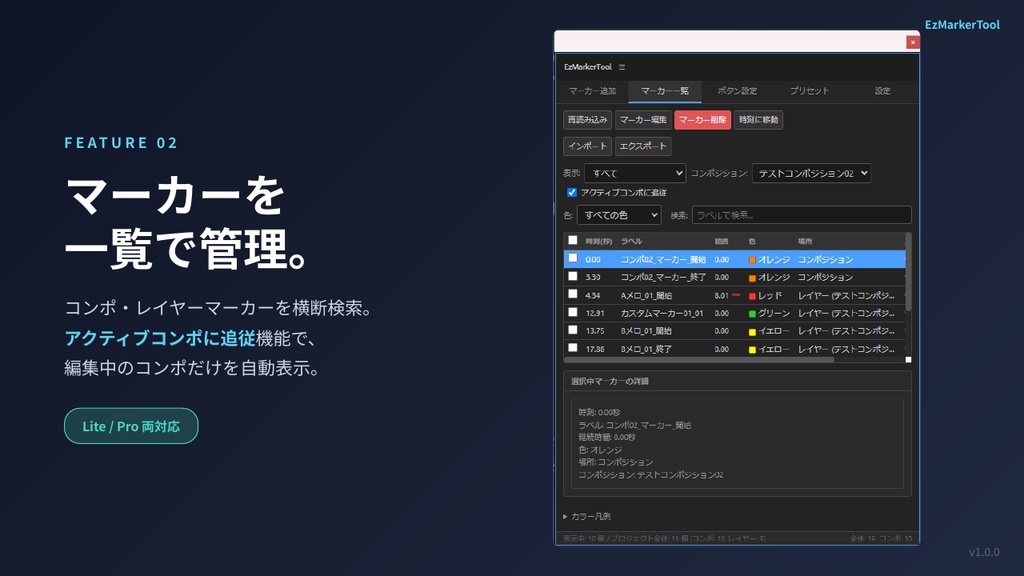
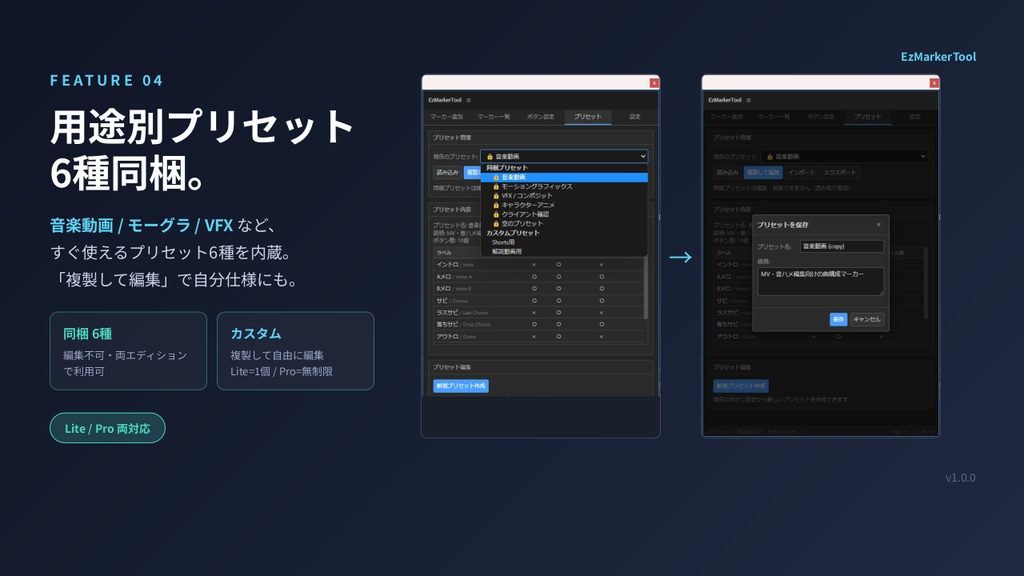
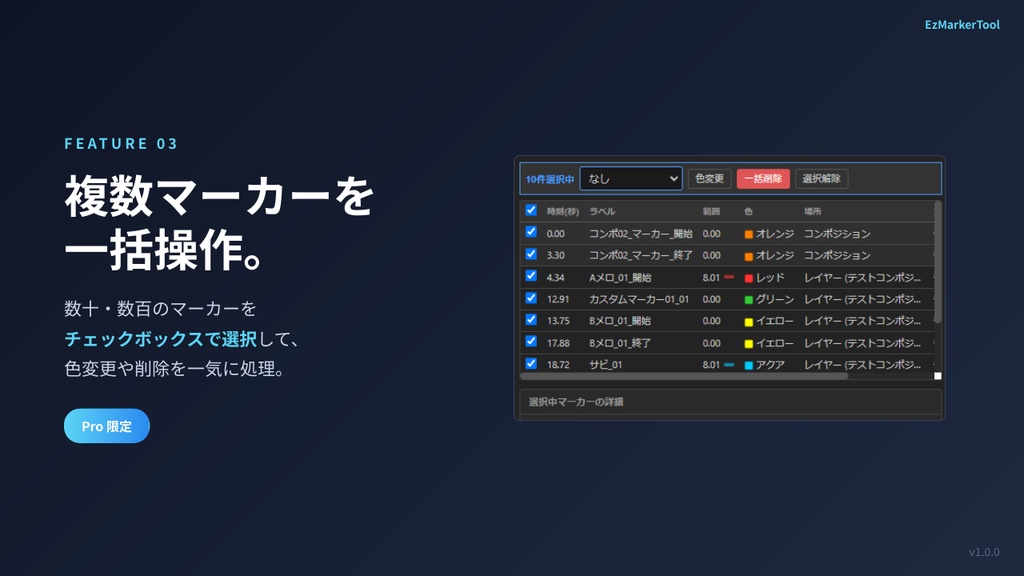
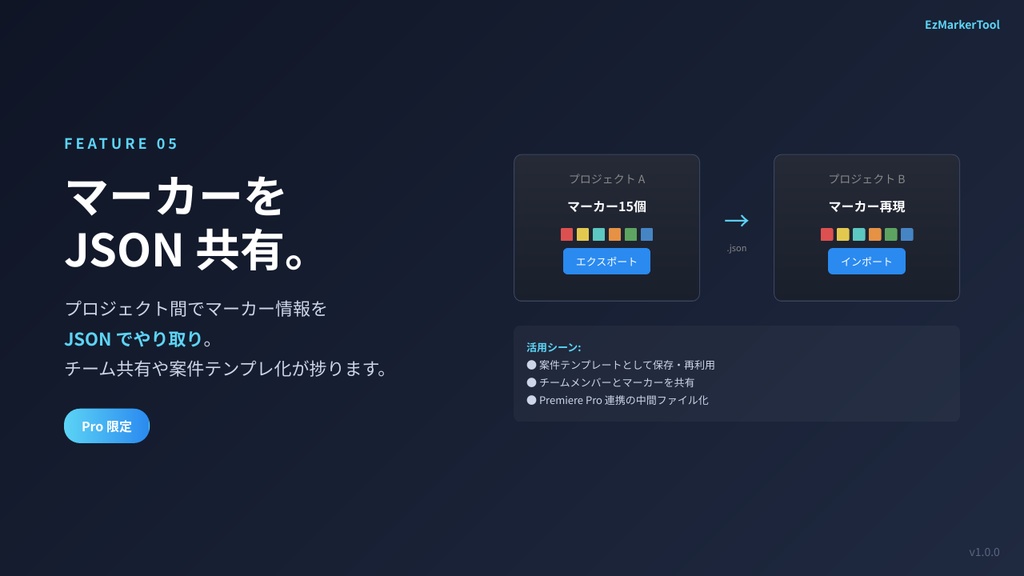
━━━ 機能一覧 ━━━ ■ マーカー追加タブ ・ カスタムボタンでワンクリックマーカー追加 ・ コメント、デュレーション、カラーを事前に設定可能 ・ フレーム単位の時間微調整(±1/±10フレーム) ・ コンポジションマーカー/レイヤーマーカー対応 ■ マーカー一覧タブ ・ プロジェクト内の全マーカーを一覧表示 ・ アクティブコンポに自動追従するフィルタ ・ テキスト検索でマーカーを素早く絞り込み ・ マーカーをクリックしてタイムラインにジャンプ ・ その場で編集・削除 ・ 一括操作(複数マーカーの一括色変更・削除など / Pro限定) ■ ボタン設定タブ ・ ボタンの追加・編集・削除・並び替え ・ ラベル、コメント、カラー(AE 17色対応)を自由にカスタマイズ ・ ラベルは日英バイリンガルで設定可能 ■ プリセットタブ ・ ボタン設定をプリセットとして保存・切り替え ・ 「空のプリセット」から自分専用セットを構築可能 ・ プリセットのインポート/エクスポートで他環境と共有可能 ■ マーカーエクスポート/インポート(Pro限定) ・ マーカー情報をJSON形式でエクスポート ・ 他プロジェクトへのインポートで再利用 ・ チームでのマーカー共有にも活用できます ■ 設定タブ ・ 日本語/英語 UI切り替え ・ 時間表示形式の切り替え(秒/フレーム) ・ マーカー自動監視(ツール外での変更を自動検知) ・ 保存先フォルダのカスタマイズ ──────────────────────────────────────────────────────────────── ━━━ Features ━━━ [ Add Markers tab ] - One-click marker creation via custom buttons - Set comment, duration, and color in advance - Frame-level time tweaking (±1 / ±10 frames) - Composition markers and layer markers both supported [ Marker List tab ] - All markers in the project shown in one list - Auto-follow filter for the active composition - Quickly narrow down with text search - Click a marker to jump the timeline - Edit or delete in place - Bulk actions (multi-marker color change / delete — Pro only) [ Button Settings tab ] - Add, edit, delete, and reorder buttons - Customize label, comment, and color (17 AE label colors) - Bilingual (JA / EN) label support [ Presets tab ] - Save and switch button configurations as presets - Build your own setup from an "Empty Preset" - Import/export presets to share across machines [ Marker Export / Import (Pro only) ] - Export marker data as JSON - Reuse markers in other projects via import - Useful for team sharing and project templating [ Settings tab ] - JA / EN UI switching - Time display format toggle (seconds / frames) - Auto marker watch (detects changes made outside the panel) - Custom save folder
無料版(Lite)と有料版(Pro)の違い / Lite (Free) vs Pro (Paid)
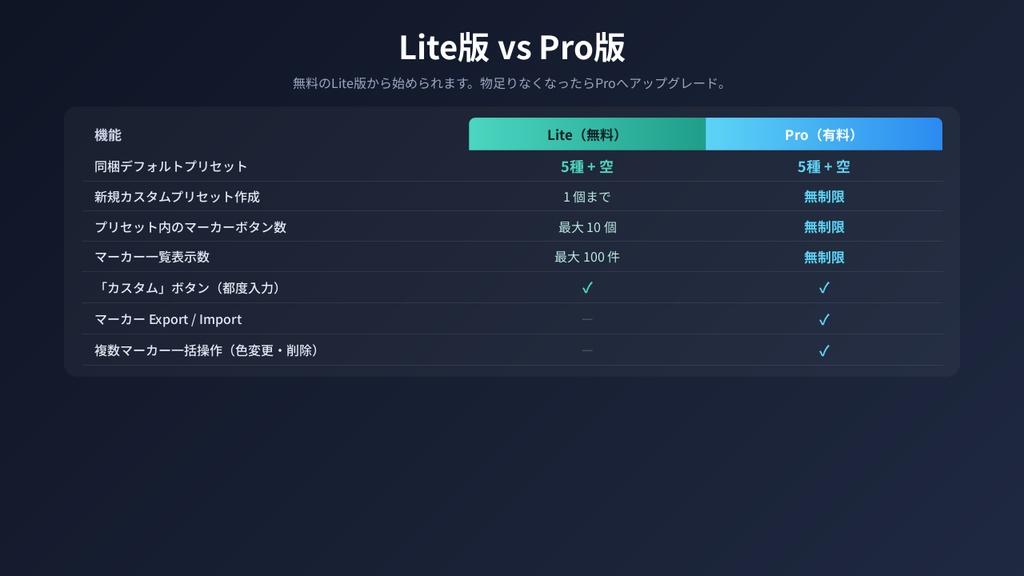
━━━ Lite版(無料) ━━━ ・ 同梱デフォルトプリセット 6種すべて利用可 (音楽動画 / モーグラ / VFX / キャラアニメ / クライアント確認 / 空) ・ 新規カスタムプリセット作成 1個まで ・ プリセット内のマーカーボタン 最大10個 ・ マーカー一覧 最大100件 ・「カスタム」ボタン(都度入力)対応 ・ アクティブコンポ追従 ・ 日英対応 UI × マーカー Export / Import × 複数マーカー一括操作 → ライトユース・お試しなら十分使えます ━━━ Pro版(¥1,000 / リリース記念セール ¥500) ━━━ ・ 同梱デフォルトプリセット 6種すべて利用可 ・ 新規カスタムプリセット作成 無制限 ・ プリセット内のマーカーボタン 無制限 ・ マーカー一覧 無制限 ・「カスタム」ボタン(都度入力)対応 ・ アクティブコンポ追従 ・ 日英対応 UI ★ マーカー Export / Import ★ 複数マーカー一括操作 → 本格運用・チーム共有・大規模案件向け ★ Lite版を試してから Pro版へのアップグレードがおすすめです。 設定したプリセットや使い慣れた操作感はそのまま引き継げます。 ──────────────────────────────────────────────────────────────── ━━━ Lite Edition (Free) ━━━ - All 6 bundled default presets available (Music Video / Motion Graphics / VFX / Character Animation / Client Review / Empty) - New custom presets: up to 1 - Marker buttons (per custom preset): up to 10 - Up to 100 markers in list view - "Custom" button (ad-hoc input) supported - Active composition follow - JA / EN UI x Marker Export / Import x Bulk marker operations -> Plenty for light use and trying out the tool ━━━ Pro Edition (¥1,000 / Launch Sale ¥500) ━━━ - All 6 bundled default presets available - New custom presets: unlimited - Marker buttons (per custom preset): unlimited - Unlimited markers in list view - "Custom" button (ad-hoc input) supported - Active composition follow - JA / EN UI * Marker Export / Import * Bulk marker operations -> For serious workflows, team sharing, and large projects * We recommend trying the Lite edition first, then upgrading to Pro. Your presets and familiar workflow carry over seamlessly.
対応環境 / Supported Environments
━━━ 動作環境 ━━━ ◆ Adobe After Effects 2024 以降(v24.0+) ◆ Windows 10 / 11(動作確認済み) ◆ macOS(理論上は動作しますが、未検証です) ※ CEP拡張機能のため、After Effects 2024 以前のバージョンでも 動作する可能性はありますが、動作保証は致しかねます。 ※ Mac版は CEP の仕様上動作するはずですが、 開発・検証は Windows 環境でのみ行っています。 Mac環境でお使いいただく場合はご了承ください。 ──────────────────────────────────────────────────────────────── ━━━ System Requirements ━━━ - Adobe After Effects 2024 or later (v24.0+) - Windows 10 / 11 (verified) - macOS (should work in theory, but not verified) Note: As a CEP extension, it may also work with earlier versions of After Effects, but this is not officially supported. Note: The Mac build should work given how CEP is designed, but development and testing have only been done on Windows. Please use on macOS at your own discretion.
インストール方法 / Installation
━━━ インストール方法は3種類 ━━━ 【方法 1】ZXP/UXP Installer を使う(★ 推奨) 最も確実で簡単な方法です。 サードパーティ製の無料ツール「ZXP/UXP Installer」を使って ZXPファイルをインストールします。 1. ZXP/UXP Installer をダウンロード(無料) https://aescripts.com/learn/zxp-installer/ 2. ZXP/UXP Installer を起動 3. 同梱の EzMarkerTool.zxp をウィンドウにドラッグ&ドロップ 4. After Effects を起動し [ウィンドウ] → [エクステンション] → [EzMarkerTool] を選択 ※ 管理者権限は不要です。 【方法 2】同梱の install.bat / install.command を実行 1. パッケージを展開 2. install.bat(Windows)または install.command(Mac)を実行 3. After Effects を再起動 ※ Windows: バッチファイルが自動的に管理者権限を要求します。 ※ Mac: ターミナルで sudo パスワードを求められる場合があります。 【方法 3】手動コピー パッケージ内の EzMarkerTool フォルダを下記の場所にコピー: ◆ Windows: C:\Program Files (x86)\Common Files\Adobe\CEP\extensions\ ◆ Mac: /Library/Application Support/Adobe/CEP/extensions/ ※ Windows / Mac とも管理者権限が必要です。 ━━━ 共通の事前準備 ━━━ CEP拡張を有効にするため、初回のみ以下のレジストリ/設定が必要です: ◆ Windows: レジストリエディタで HKEY_CURRENT_USER\Software\Adobe\CSXS.X に PlayerDebugMode (REG_SZ) = 1 を追加(X = CEPバージョン) ◆ Mac: ターミナルで以下を実行 defaults write com.adobe.CSXS.X PlayerDebugMode 1 ★ install.bat / install.command を使う場合は、 この設定も自動的に行われます。 ──────────────────────────────────────────────────────────────── ━━━ Three Installation Methods ━━━ [Method 1] Use ZXP/UXP Installer (* Recommended) The easiest and most reliable approach. Use the free third-party tool "ZXP/UXP Installer" to install the ZXP file. 1. Download ZXP/UXP Installer (free) https://aescripts.com/learn/zxp-installer/ 2. Launch ZXP/UXP Installer 3. Drag and drop the bundled EzMarkerTool.zxp into the window 4. Launch After Effects and choose [Window] -> [Extensions] -> [EzMarkerTool] Note: No admin privileges required. [Method 2] Run the bundled install.bat / install.command 1. Extract the package 2. Run install.bat (Windows) or install.command (Mac) 3. Restart After Effects Note (Windows): The batch file automatically requests admin privileges. Note (Mac): Terminal may prompt for your sudo password. [Method 3] Manual copy Copy the EzMarkerTool folder from the package to: - Windows: C:\Program Files (x86)\Common Files\Adobe\CEP\extensions\ - Mac: /Library/Application Support/Adobe/CEP/extensions/ Note: Both Windows and Mac require admin privileges. ━━━ One-time setup (all methods) ━━━ To enable CEP extensions, the following registry/setting is required once: - Windows: In Registry Editor, add to HKEY_CURRENT_USER\Software\Adobe\CSXS.X PlayerDebugMode (REG_SZ) = 1 (X = your CEP version) - Mac: In Terminal, run defaults write com.adobe.CSXS.X PlayerDebugMode 1 * The install.bat / install.command also takes care of this for you.
使い方 / Usage
━━━ 基本の流れ ━━━ 【1】ボタンを設定する 「ボタン設定」タブで、よく使うマーカーを登録します。 ラベル、コメント、デュレーション、色を自由に設定。 【2】マーカーを追加する 「マーカー追加」タブから、登録したボタンをワンクリック。 再生位置(カレントタイムインジケーター)にマーカーが追加されます。 レイヤーが選択されていればレイヤーマーカー、 そうでなければコンポジションマーカーになります。 【3】一覧で確認・編集する 「マーカー一覧」タブで、プロジェクト全体のマーカーを確認。 「アクティブコンポに追従」をONにしておけば、 編集中のコンポのマーカーだけが自動表示されます。 クリックでタイムラインにジャンプ、その場で編集・削除も可能。 【4】プリセットで使い分ける 「プリセット」タブで、案件ごとにボタン構成を切り替え。 チームメンバーとプリセットを共有することもできます。 ━━━ こんな方におすすめ ━━━ ◇ MV/CM/アニメで多数のキューマーカーを管理したい ◇ 効果音/カット割の目印を効率的に打ちたい ◇ 複数案件で同じマーカー構成を使い回したい ◇ チームでマーカー情報を共有したい(Pro版) ◇ 既存プロジェクトのマーカーを別プロジェクトで再利用したい(Pro版) ──────────────────────────────────────────────────────────────── ━━━ Basic Workflow ━━━ [1] Configure your buttons In the "Button Settings" tab, register your frequently used markers. Set label, comment, duration, and color freely. [2] Add markers In the "Add Markers" tab, click any registered button once. A marker is added at the current time indicator. If a layer is selected it becomes a layer marker; otherwise it becomes a composition marker. [3] Review and edit in the list Use the "Marker List" tab to see every marker across the project. Turn on "Follow active comp" to automatically show only the markers of the composition you're currently editing. Click to jump on the timeline, or edit / delete in place. [4] Switch contexts with presets In the "Presets" tab, swap button configurations per project. Presets can also be shared with team members. ━━━ Recommended for ━━━ - Managing lots of cue markers in MV / CM / animation work - Quickly placing markers for SFX or cut planning - Reusing the same marker setup across multiple projects - Sharing marker info across a team (Pro) - Carrying markers from one project to another (Pro)
ライセンス・サポート / License & Support
━━━ ライセンス ━━━ ◆ 個人利用・商用利用ともに可能です ◆ 1ライセンスにつき、購入者本人が使用する PC(複数台可)にて使用可 ◆ 再配布・転売は禁止 ◆ 改変・リバースエンジニアリングは禁止 ◆ 本ツールを使用したことによる損害について、作者は一切の責任を負いません ━━━ サポート ━━━ 不具合報告・要望は Booth のメッセージ機能、または 下記の連絡先までお気軽にどうぞ。 ◆ Booth メッセージ ◆ X (Twitter) DM ※ 個別の改修依頼や、特殊な環境での動作対応については 対応できない場合があります。あらかじめご了承ください。 ━━━ アップデート ━━━ 購入後のアップデートは無料でご提供します。 Booth の購入履歴から最新版をダウンロードできます。 バージョン情報や更新履歴は、同梱の README.txt または パネル内の「設定」タブで確認できます。 ──────────────────────────────────────────────────────────────── ━━━ License ━━━ - Personal and commercial use both permitted - One license covers the purchaser's own PCs (multiple machines OK) - Redistribution and resale are prohibited - Modification and reverse engineering are prohibited - The author assumes no liability for any damage caused by using this tool ━━━ Support ━━━ For bug reports and feature requests, please reach out via Booth message or the contacts below. - Booth message - X (Twitter) DM Note: Custom modifications or support for unusual environments may not always be possible. Thank you for your understanding. ━━━ Updates ━━━ Updates after purchase are provided free of charge. Download the latest version from your Booth purchase history. Version info and changelog are available in the bundled README.txt and in the "Settings" tab inside the panel.