
Muni Pixel Viewer|コメントでドットキャラが登場!配信オーバーレイ【わんコメ・OBS対応】
- 無料体験版ダウンロード商品¥ 0
- 通常版ダウンロード商品¥ 500
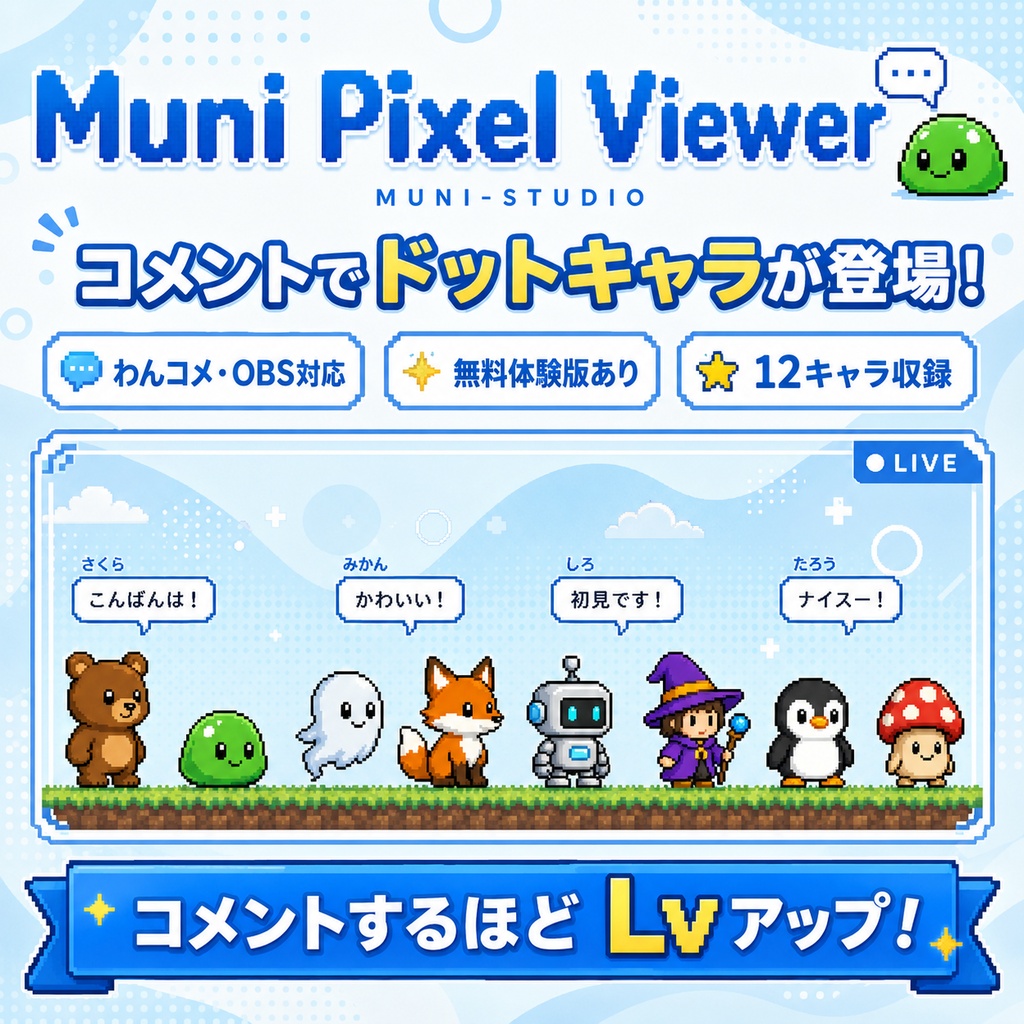
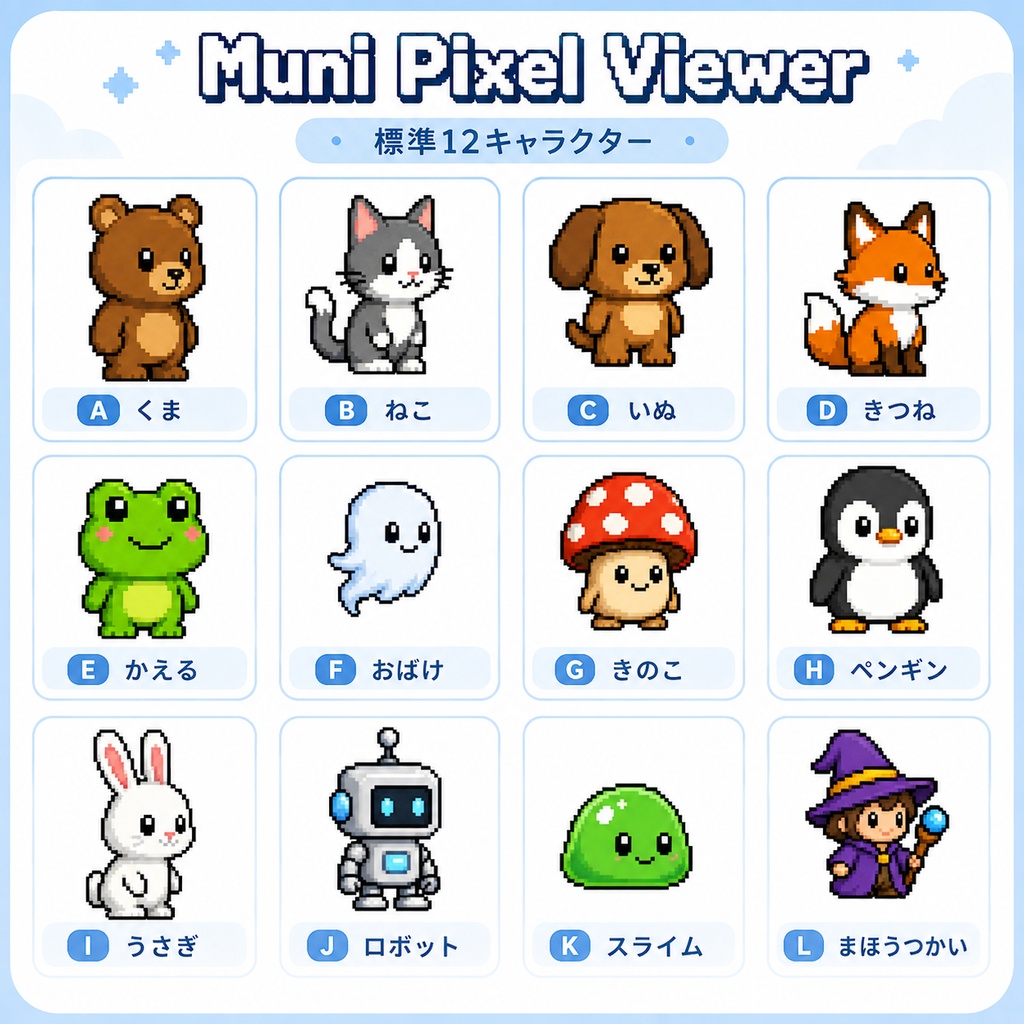


# Muni Pixel Viewer **コメントしたら、あなたのドットキャラが配信画面にやってくる。** **Muni Pixel Viewer** は、わんコメ・OBSに対応したドットキャラクター配信オーバーレイです。 視聴者がコメントすると、その視聴者にドットキャラクターを自動で割り当てます。 一度決まったキャラクターは保存されるため、次にコメントしたときも**同じキャラクターで登場**します。 キャラクターたちは配信画面の中を歩いたり、ジャンプしたり、コメントに反応したりします。 コメント内容は、キャラクターの頭上に吹き出しで表示されます。 さらに、通常コメントをするたびにXPを獲得。 **コメントするほどXPが増え、レベルが上がっていきます。** 現在のキャラクター・Lv・XPは、 `ステータス` または `!status` とコメントすることで確認できます。 --- ## 通常版には12キャラクターを収録 Muni Pixel Viewer 通常版には、以下の12種類のドットキャラクターを収録しています。 * くま * ねこ * いぬ * きつね * かえる * おばけ * きのこ * ペンギン * うさぎ * ロボット * スライム * まほうつかい 同じ種類のキャラクターが複数の視聴者に割り当てられる場合があります。 キャラクターが同じでも、XP・Lvなどの視聴者データはそれぞれ個別に管理されます。 --- ## 主な機能 * 視聴者ごとにドットキャラクターを自動割り当て * 同じ視聴者は次回も同じキャラクターで登場 * 通常コメントでXPを獲得 * XPに応じてレベルアップ * `ステータス` / `!status` でキャラクター・Lv・XPを確認 * コメントをキャラクターの吹き出しとして表示 * 歩行・ジャンプ・コメントリアクション * 最大12キャラクターを同時表示 * 13人以上の場合は待機中の視聴者と少しずつ交代 * コメントが多い配信向けの混雑制御 * 多人数時も吹き出しを公平にローテーション * キャラクター・XP・Lvなどの視聴者データを保存 * 背景透過 * わんコメ対応 * OBS対応 * 日本語 / English対応 * 追加キャラクターパック対応 --- ## 視聴者が多い配信にも対応 画面上に表示されるキャラクターは最大12体です。 13人以上の視聴者がコメントした場合も、最初の12人だけで固定されるのではなく、待っている視聴者と**少しずつキャラクターが交代**します。 一度画面から退場しても、その視聴者に保存されているキャラクターは変わりません。 再び登場したときも、同じキャラクターで戻ってきます。 コメントが大量に流れた場合は、XPや視聴者データを処理しながら、画面上の吹き出しや登場演出を自動的に調整します。 大量のコメントで画面が埋め尽くされにくいよう制御しています。 --- ## 無料体験版もあります 購入前に試せる **Muni Pixel Viewer Free** も用意しています。 無料体験版には、 * くま * スライム * おばけ の3キャラクターを収録しています。 コメント連動・XP・レベル・吹き出し・多人数表示など、Muni Pixel Viewerの基本機能を実際の配信環境でお試しいただけます。 まずはご自身の環境で動作を確認したい方は、無料体験版をご利用ください。 --- # 使い方 ## 1. BOOTHからダウンロードした商品ZIPを解凍 BOOTHからダウンロードした商品ZIPを、最初に一度だけ解凍してください。 通常版には、 `Muni-Pixel-Viewer-template.zip` 無料体験版には、 `Muni-Pixel-Viewer-Free-template.zip` が入っています。 **このテンプレートZIPは解凍しないでください。** ZIPのまま、わんコメへ追加します。 --- ## 2. Muni Pixel Viewerをわんコメに追加 わんコメのテンプレート一覧を開き、テンプレートZIPを追加してください。 ### 通常版 `Muni-Pixel-Viewer-template.zip` ### 無料体験版 `Muni-Pixel-Viewer-Free-template.zip` 追加すると、わんコメのテンプレート一覧に **Muni Pixel Viewer** または **Muni Pixel Viewer Free** が表示されます。 --- ## 3. OBSに追加 わんコメのテンプレート一覧に表示された **「ここをドラッグしてOBSに入れる」** をOBSへドラッグしてください。 OBSのブラウザソースは、 **1920 × 1080** での使用を推奨しています。 背景は透過されているため、そのまま配信画面の上に重ねて使用できます。 --- ## 4. コメントして動作確認 わんコメでコメントを受信すると、視聴者にドットキャラクターが自動で割り当てられます。 ### 初めてコメントした視聴者 キャラクターを自動で抽選します。 ### 2回目以降 保存されている前回と同じキャラクターで登場します。 キャラクターは画面内を歩いたり、ジャンプしたり、コメントに合わせて反応します。 コメント内容はキャラクターの頭上に吹き出しで表示されます。 --- ## 5. XP・レベルを確認 通常コメントをするとXPが増え、一定のXPがたまるとレベルアップします。 コメント欄で、 `ステータス` または `!status` と入力すると、自分の * キャラクター * レベル * XP を確認できます。 `!status` は日本語・英語どちらの環境でも使用できます。 ※現在、レベルによってキャラクターの見た目が変化・進化する機能はありません。 --- # 追加キャラクターパックについて Muni Pixel Viewerは、別売り・追加配布されている**キャラクターパック**にも対応しています。 キャラクターパックの導入には、 **Muni Pixel Viewer キャラ追加ツール** を使用します。 無料体験版・通常版のどちらでも使用できます。 --- # キャラクターパックの追加方法 ## 1. 先にMuni Pixel Viewerをわんコメへ追加 キャラクターパックを追加する前に、通常版または無料体験版のMuni Pixel Viewerをわんコメへ追加してください。 --- ## 2. わんコメにインストールされたテンプレートフォルダを確認 わんコメのテンプレート一覧から、使用中のMuni Pixel Viewerの**フォルダを開いてください。** キャラ追加ツールで指定するのは、BOOTHからダウンロードした商品フォルダやZIPではありません。 **わんコメにインストールされたテンプレートフォルダを指定します。** ### 通常版 `Muni-Pixel-Viewer-template` ### 無料体験版 `Muni-Pixel-Viewer-Free-template` --- ## 3. Muni Pixel Viewer キャラ追加ツールを起動 商品に含まれている **Muni Pixel Viewer キャラ追加ツール** を起動してください。 ツールには、 * Setup版 * Portable版 の2種類があります。 通常は**Setup版**の使用をおすすめします。 インストールせず使用したい場合はPortable版をご利用ください。 --- ## 4. OVERLAYフォルダを指定 キャラ追加ツールの **「フォルダを選択」** を押します。 そして、手順2で確認した**わんコメにインストール済みのテンプレートフォルダ**を選択してください。 ### 通常版を使用している場合 `Muni-Pixel-Viewer-template` ### 無料体験版を使用している場合 `Muni-Pixel-Viewer-Free-template` を選択します。 **以下は選択しないでください。** * `Muni-Pixel-Viewer-template.zip` * `Muni-Pixel-Viewer-Free-template.zip` * BOOTHからダウンロードした商品フォルダ * 商品ZIPの中身を表示しているだけのZIP内フォルダ --- ## 5. キャラクターパックZIPを追加 キャラ追加ツールへ、購入したキャラクターパックZIPを**解凍せず、そのままドラッグ&ドロップ**してください。 内容が検証され、問題がなければ追加できます。 --- ## 6. わんコメを再起動 キャラクターパックを追加したら、反映のため**わんコメを再起動してください。** 再起動後、新しいキャラクターが抽選候補に追加されます。 --- ## キャラ追加ツールでできること 追加済みのキャラクターパックは、 * 有効化 * 無効化 * 更新 * 削除 ができます。 ※標準キャラクターパックは削除できません。 ※キャラクターパックの追加・更新・有効化・無効化・削除を行ったあとは、反映のため**わんコメを再起動してください。** --- # 動作環境 * Windows * わんコメ * OBS Studio ※わんコメ・OBS Studioは本商品には含まれません。 --- # ご注意 * BOOTHからダウンロードした商品ZIPは最初に解凍してください。 * 商品ZIP内の `Muni-Pixel-Viewer-template.zip` / `Muni-Pixel-Viewer-Free-template.zip` は解凍せず、そのままわんコメへ追加してください。 * キャラ追加ツールで指定するOVERLAYフォルダは、**わんコメにインストールされた `Muni-Pixel-Viewer-template` または `Muni-Pixel-Viewer-Free-template` フォルダです。** * キャラクターパックZIPも解凍せず、そのままキャラ追加ツールへドラッグ&ドロップしてください。 * 視聴者のキャラクター・XP・Lvなどのデータはローカル環境に保存されます。 * レベルによってキャラクターの外見が進化する機能は現在ありません。 * キャラクターパックを変更したあとは、反映のためわんコメを再起動してください。 * キャラ追加ツールは未署名のWindowsアプリのため、環境によってWindows SmartScreenの警告が表示される場合があります。
English
Muni Pixel Viewer **Leave a comment, and your pixel character appears on stream.** **Muni Pixel Viewer** is a pixel-character stream overlay for **OneComme and OBS**. When a viewer comments for the first time, a pixel character is automatically assigned to them. The assignment is saved, so the **same viewer returns as the same character** when they comment again. Characters walk around the stream, jump, react to comments, and display messages in speech bubbles above their heads. Viewers also earn XP by commenting. **As their XP increases, their level goes up.** Viewers can use `!status` to check their current character, level, and XP. --- ## 12 Built-in Characters The Full Version includes 12 built-in pixel characters: * Bear * Cat * Dog * Fox * Frog * Ghost * Mushroom * Penguin * Rabbit * Robot * Slime * Wizard More than one viewer may receive the same character type, but each viewer's XP, level, and saved data are managed separately. --- ## Main Features * Automatically assigns a pixel character to each viewer * The same viewer keeps the same assigned character * Earn XP by commenting * Level up as XP increases * Check Character / Level / XP with `!status` * Speech bubbles for viewer comments * Walking, jumping, and comment reactions * Up to 12 viewer characters on screen * Gradual character rotation when more viewers are waiting * High-traffic control for busy chats * Fair speech-bubble rotation * Saved character assignments, XP, and levels * Transparent background * OneComme support * OBS support * Japanese / English support * Additional Character Pack support --- ## Designed for Busy Chats Up to 12 viewer characters can appear on screen at once. When more viewers are waiting, characters rotate gradually instead of rapidly replacing one another. A viewer's assigned character does not change when their character leaves the screen. When they appear again, they return as the same character. When chat gets very busy, Muni Pixel Viewer continues processing viewer data and XP while automatically limiting speech bubbles and presentation effects to keep the screen manageable. --- ## Free Version Available A free version, **Muni Pixel Viewer Free** is also available. The Free Version includes 3 built-in characters: * Bear * Slime * Ghost The core features—including comment interaction, XP, levels, speech bubbles, and multi-viewer display—can be tested in your own streaming environment. --- # How to Use ## 1. Extract the ZIP downloaded from BOOTH First, extract the product ZIP downloaded from BOOTH. Inside the Full Version package you will find: `Muni-Pixel-Viewer-template.zip` Inside the Free Version package you will find: `Muni-Pixel-Viewer-Free-template.zip` **Do not extract these template ZIP files.** They should be added directly to OneComme. --- ## 2. Add Muni Pixel Viewer to OneComme Open the template list in OneComme and add the appropriate template ZIP. ### Full Version `Muni-Pixel-Viewer-template.zip` ### Free Version `Muni-Pixel-Viewer-Free-template.zip` After installation, you should see: **Muni Pixel Viewer** or **Muni Pixel Viewer Free** in the OneComme template list. --- ## 3. Add it to OBS From the OneComme template list, drag the template's OBS item into OBS. A Browser Source size of **1920 × 1080** is recommended. The background is transparent, so the overlay can be placed directly over your stream layout. --- ## 4. Send a Comment When OneComme receives a comment, a pixel character is automatically assigned to that viewer. ### First Comment A character is randomly assigned. ### Future Comments The same viewer returns as the same saved character. Characters walk, jump, react, and display comments in speech bubbles. --- ## 5. Check Level and XP Viewers gain XP by sending normal comments. As XP increases, their level goes up. Send: `!status` to check your current: * Character * Level * XP Character appearance currently does not evolve or change based on level. --- # Installing Character Packs Muni Pixel Viewer supports additional Character Packs. Use the **Muni Pixel Viewer Character Pack Tool** to install them. The same tool works with both the Free and Full Versions. --- # How to Install a Character Pack ## 1. Install Muni Pixel Viewer in OneComme first Before installing a Character Pack, make sure the Full or Free Version of Muni Pixel Viewer has already been added to OneComme. --- ## 2. Locate the template folder installed by OneComme From the OneComme template list, open the folder for the Muni Pixel Viewer version you are currently using. The Character Pack Tool must point to the **template folder installed by OneComme**. Do not select the ZIP downloaded from BOOTH or a folder inside that ZIP. ### Full Version Select: `Muni-Pixel-Viewer-template` ### Free Version Select: `Muni-Pixel-Viewer-Free-template` --- ## 3. Open the Muni Pixel Viewer Character Pack Tool Launch the **Muni Pixel Viewer Character Pack Tool** included with the product. Two versions are included: * Setup Version * Portable Version The **Setup Version** is recommended for most users. Use the Portable Version if you prefer to run the tool without installing it. --- ## 4. Select the OVERLAY folder Click: **Select Folder** in the Character Pack Tool. Then select the template folder installed by OneComme. ### Full Version `Muni-Pixel-Viewer-template` ### Free Version `Muni-Pixel-Viewer-Free-template` **Do not select:** * `Muni-Pixel-Viewer-template.zip` * `Muni-Pixel-Viewer-Free-template.zip` * the folder where you extracted the BOOTH download * a folder being viewed inside a ZIP archive --- ## 5. Install the Character Pack ZIP Drag and drop the purchased Character Pack ZIP directly into the Character Pack Tool. **Do not extract the Character Pack ZIP.** The tool will validate the package before installing it. --- ## 6. Restart OneComme After installing the Character Pack, **restart OneComme**. The newly installed characters will then be added to the available character pool. --- ## Character Pack Management Installed Character Packs can be: * Enabled * Disabled * Updated * Removed The built-in character pack cannot be removed. **Please restart OneComme after installing, updating, enabling, disabling, or removing a Character Pack.** --- # Requirements * Windows * OneComme * OBS Studio OneComme and OBS Studio are not included with this product. --- # Notes * Extract the main product ZIP downloaded from BOOTH first. * Do not extract the Muni Pixel Viewer template ZIP inside the product package. * In the Character Pack Tool, select the **`Muni-Pixel-Viewer-template` or `Muni-Pixel-Viewer-Free-template` folder installed by OneComme** as the OVERLAY folder. * Do not extract purchased Character Pack ZIP files before installing them. * Viewer character assignments, XP, and levels are stored locally. * Character appearance currently does not evolve based on level. * Restart OneComme after making changes to Character Packs. * The Character Pack Tool is currently unsigned, so Windows SmartScreen may display a warning depending on your environment.