KKBoneGen: 骨を追加し、ウェイトペイント、オブジェクトのポリゴン数を増やすプラグイン(KK/KKS)
- Digital1,500 JPY
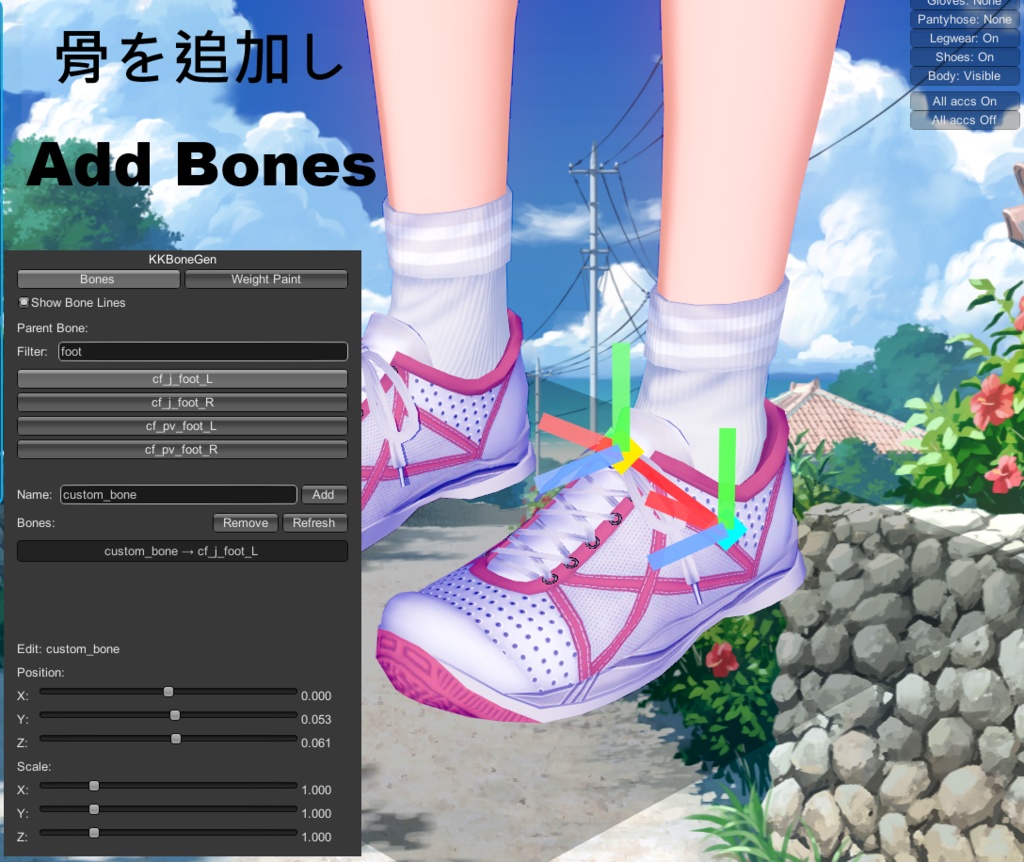
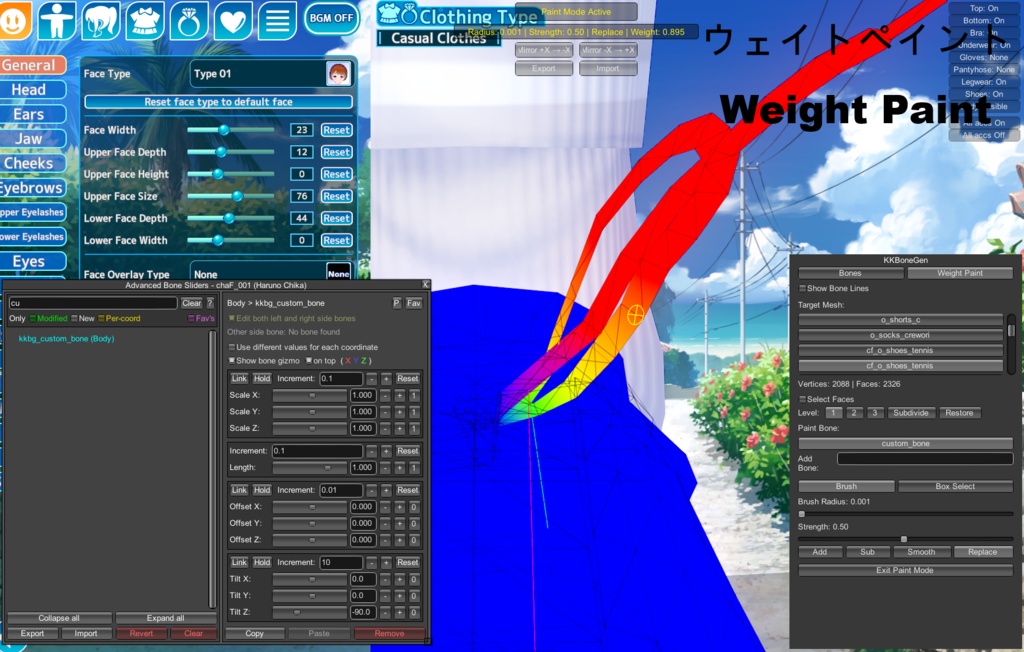
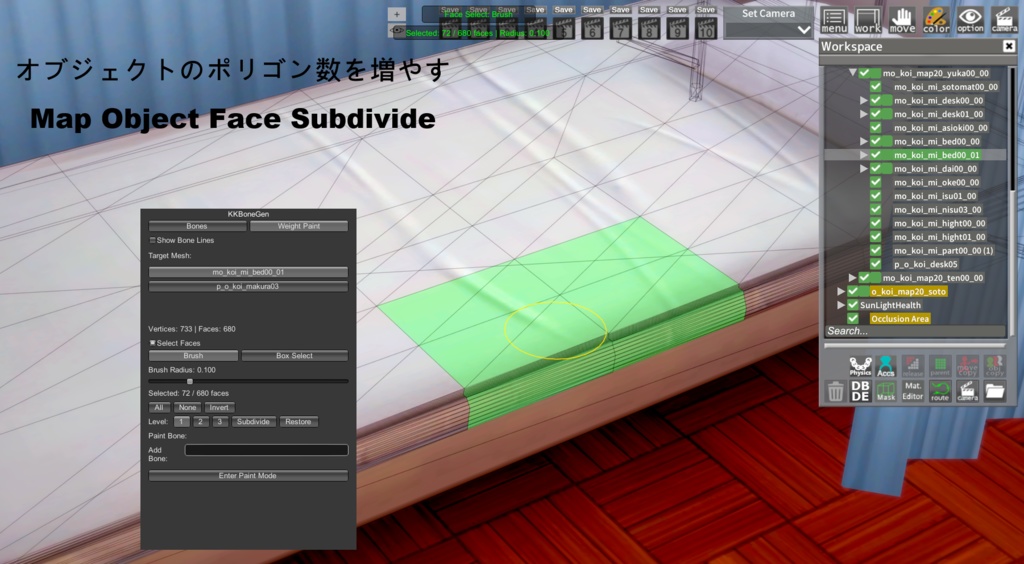
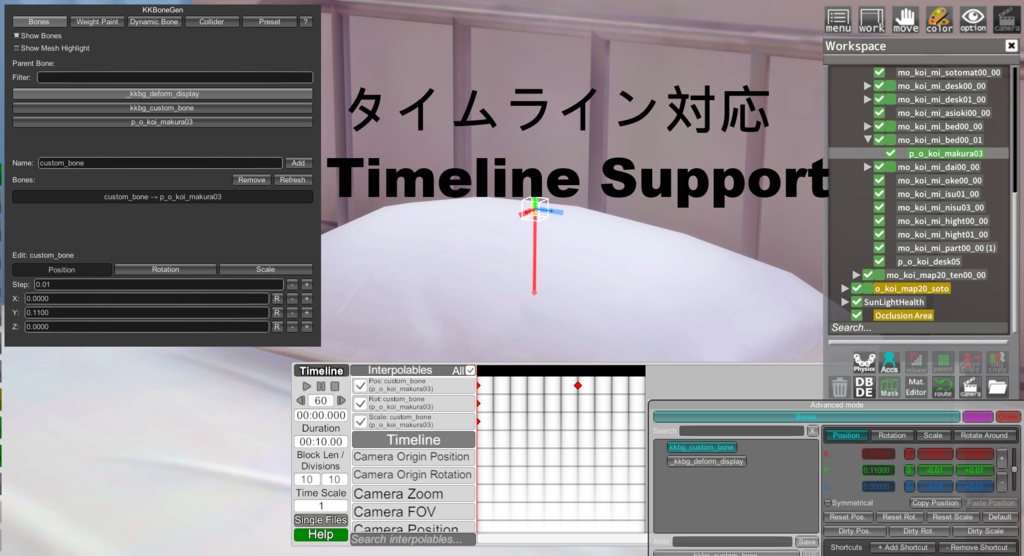
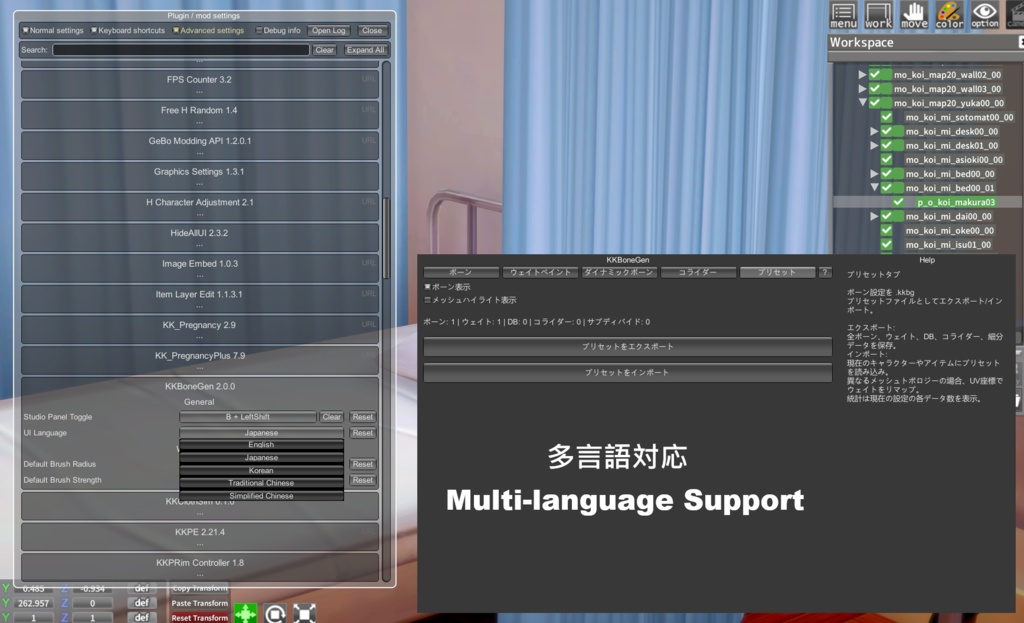


This plugin utilizes the following open-source components: IllusionModdingAPI Copyright © ManlyMarco Licensed under LGPL-3.0 Source Code: https://github.com/IllusionMods/IllusionModdingAPI Full License: https://github.com/IllusionMods/IllusionModdingAPI/blob/master/LICENSE ExtensibleSaveFormat (BepisPlugins) Copyright © bbepis Licensed under LGPL-3.0 Source Code: https://github.com/IllusionMods/BepisPlugins Full License: https://github.com/IllusionMods/BepisPlugins/blob/master/LICENSE Timeline (HSPlugins) Copyright © DeathWeasel1337 Licensed under MIT Source Code: https://github.com/IllusionMods/HSPlugins Full License: https://github.com/IllusionMods/HSPlugins/blob/main/LICENSE ===================================================== KKBoneGen 2.0.2 アップデートリリース 新機能: ポリゴン削減 (リダクション): 「Select Faces」を使用して、編集したい高ポリゴンオブジェクトを選択し、面数を削減できるようになりました。 ポリゴン削除: 「Select Faces」を使用して、選択した面を削除できるようになりました。 修正項目: CharStudio 環境において、ウェイトペイント後のキャラクターのボーンを動かした際、乳首や陰毛のテクスチャが消失またはズレてしまう不具合を修正しました。 ===================================================== KKBoneGen 2.0.1 アップデートリリース 主な更新内容:ウェイトペイント機能の強化 Undo/Redo(元に戻す/やり直し): ウェイトペイント中に操作を取り消したり、やり直したりできるようになりました。 ショートカットキー:Ctrl + Z (Undo) | Ctrl + Y (Redo) Reset(リセット): すべてのウェイトをクリアしたい場合、ボタン一つで実行可能になりました。 Paint Through(透過ペイント): この機能を有効にすると、ブラシがメッシュを突き抜けて背面の頂点にもウェイトを塗ることができます。 Normal Falloff(法線減衰): 有効にすると、広範囲をペイントする際にオブジェクトの背面が塗られないよう保護されます。言葉では説明しづらいですが、オン/オフを切り替えて描画結果の差を確認してみてください。 修正済みバグ: CharStudio 環境において、IK/FK でポーズを変更したキャラクターに対し「Select Faces」モードを使用すると、ワイヤーフレームの表示が T-Pose に戻ってしまう不具合を修正しました。 ===================================================== お待たせいたしました、KKBoneGen 2.0.0 アップデートをリリースしました。 追加機能: Dynamic Bone: ゲーム標準の Dynamic Bone と同様の動態ボーンシステムです。追加したボーンに物理シミュレーションを適用できます。デフォルトでキャラクター既存のコライダーと反応するほか、本プラグインで新しいコライダーを作成して干渉させることも可能です。 Collider: Dynamic Bone と相互作用するコライダーを追加できます。コライダーはボーンに追従させることが可能です。Studio モードでは、マップオブジェクトにコライダーを追加し、キャラの Dynamic Bone と反応させることもできます。 Preset: キャラクターのボーン、ウェイト、Dynamic Bone、コライダー設定を別のキャラへ簡単にコピーできます。衣装に塗られたウェイトが含まれる場合、コピー先も同じ衣装を着用している必要があります。書き出し形式は独自形式(.kkbg)です。 Help パネル: 各タブの機能を簡潔に説明するヘルプパネルを追加しました。 Timeline サポート: Timeline 上で、本プラグインで追加したボーンの移動・回転・スケールのキーフレーム設定が可能になりました。 多言語対応: UI 表示に日本語、韓国語、繁体字、簡体字を追加しました。 修正点: Koikatsu Party (Steam版) でプラグインがスキップされる問題を修正。 Skin のないアクセサリを保存した際、サブディビジョン(細分化)データが消失する問題を修正。 ===================================================== キャラクターやマップオブジェクト(※一部対応)に対して、ボーンの追加、ウェイトペイント、オブジェクトのポリゴン数を増やす操作が行える KK/KKS 用プラグインです。 インストール方法: zip ファイルを解凍し、対応するゲームの DLL ファイルを BepInEx\plugins フォルダにコピーしてください。 使用方法: ショートカットキー Shift+B でウィンドウを開きます。 1. ボーンの追加: 1.1. 上部のタブを Bones に切り替えます。 1.2. キャラクターの場合は、Parent Bone リストから新しいボーンを配置したい親ボーンを選択してください。オブジェクトにデフォルトでボーンが存在しない場合は、Parent Bone リストでオブジェクト本体を選択します。 1.3. Name 入力欄に新しいボーンの名前を入力します。 1.4. Add ボタンをクリックしてボーンを追加します。 1.5. 下部のインターフェースで、新しく追加したボーンの位置・回転・スケールを調整できます。 2. ウェイトペイント: 2.1. 上部のタブを Weight Paint に切り替えます。 2.2. まず Target Mesh リストからウェイトを描画するオブジェクトを選択し、次に Paint Bone リストからボーンを選択します。デフォルトでは追加したボーンのみが表示されます。既存のボーンを選択したい場合は、Add Bone の検索欄に追加したいボーン名を入力し、ボーンをクリックすると Paint Bone リストに追加されます。 2.3. Enter Paint Mode ボタンをクリックしてウェイトペイントモードに入ります。 2.4. ウェイトペイントモード中にカメラ視点を操作する場合は、Ctrl キーを押しながらマウスの左右ボタンで操作してください。 2.5. 描画モードは「ブラシ」と「マウスによる矩形選択」の 2 種類があります。オブジェクトの状況に応じて切り替えて使用できます。 2.6. 矩形選択モードでは、Shift+マウス左ボタン で頂点を複数選択、Alt+マウス左ボタン で選択解除ができます。 2.7. Add:ウェイト値を増加 Sub:ウェイト値を減少 Smooth:頂点間のウェイト値を平均化 Replace:ウェイト値を置き換え 2.8. Brush Radius:ブラシサイズ Strength:描画強度 2.9. Exit Paint Mode ボタンをクリックしてウェイトペイントモードを終了します。 3. オブジェクトのポリゴン数を増やす: 3.1. 上部のタブを Weight Paint に切り替えます。 3.2. Target Mesh リストからポリゴン数を増やしたいオブジェクトを選択します。 3.3. Select Faces にチェックを入れると、面を選択して細分化するモードに入ります。チェックを入れずに Subdivide ボタンをクリックすると、オブジェクト全体のポリゴン数が増加します。 3.4. 面選択細分化モード中にカメラ視点を操作する場合は、Ctrl キーを押しながらマウスの左右ボタンで操作してください。 3.5. 選択モードは「ブラシ」と「マウスによる矩形選択」の 2 種類があり、状況に応じて切り替え可能です。 3.6. 矩形選択モードでは、Shift+マウス左ボタン で複数選択、Alt+マウス左ボタン で選択解除ができます。 3.7. All:すべての面を選択 None:すべての選択を解除 Invert:選択を反転(選択済みの面は解除、未選択の面はすべて選択) 3.8. Level:細分化レベル(1~3)。数値が大きいほどポリゴン数は増えますが、ウェイトペイント作業や PC の負荷も増加します。まずはレベル 1 から徐々に増やすことを推奨します。 3.9. Subdivide:Level に応じてポリゴン数を増加 Restore:オブジェクトを元のポリゴン数に戻す 注意事項: Uncensor Selector 等で別のボディータイプに切り替えた際、Subdivide が解除されることがありますが、これは仕様(正常な挙動)です。 ボディータイプごとに見た目は同じでも頂点順序が異なるため、そのまま適用するとメッシュが破損(面崩れ)してしまいます。 この破損を防ぐための保護機能として、ボディー切り替え時に Subdivide 状態をリセットするようにしています。 既知の問題: KK ではペイントモード使用時に、軽微なカクつきが発生する場合があります。これは KK が使用している Unity のバージョンが古いためで、最適化は行っていますが、オブジェクトのポリゴン数が多い場合には動作が重くなることがあります。 KKS では Sunshine Map のオブジェクトに対して、ボーンの追加、ウェイトペイント、ポリゴン分割(細分化)を行うことができません。一方、KK のデフォルトマップおよび他のサードパーティ作者によるマップは、理論上対応しています。 Q&A: Q:ボーンとウェイトにはどのような関係がありますか? なぜボーンを追加した後にウェイトを塗る必要があるのですか? A:この点については、まず Blender のリギングに関するチュートリアルをご覧いただき、リギングの基礎知識を学ぶことをおすすめします。 Q:CharaStudio では、マップオブジェクトに対してのみボーンの追加、ウェイトペイント、ポリゴン細分化が可能なのですか? A:キャラクターに対しても行うことができます。 Q:ウェイトを描いた後にオブジェクトのポリゴン数を増やすと、ウェイトが崩れてしまうのはなぜですか? A:オブジェクトの頂点順が変わってしまうためです。正しい手順は、先にオブジェクトのポリゴン数を増やし、その後でウェイトペイントを行うことです。
English
KKBoneGen 2.0.2 Update Released New Features: Mesh Decimation (Poly Reduction): You can now use Select Faces to choose high-poly objects for polygon reduction. Face Deletion: You can now use Select Faces to select and delete specific faces from an object. Bug Fixes: Fixed an issue in the CharStudio environment where moving bones after painting weights would cause nipple or pubic hair textures to disappear or shift. ===================================================== KKBoneGen 2.0.1 Update Released Major Enhancements: Weight Painting Features Undo/Redo: You can now undo or redo actions while weight painting. Shortcuts: Ctrl + Z (Undo) | Ctrl + Y (Redo) Reset: If you need to clear all weights, you can now do so with a single click. Paint Through: When enabled, the brush can penetrate the mesh to paint weights on the underlying/backside geometry. Normal Falloff: When enabled, the backface of the object will not be affected during large-area painting. It’s best understood by toggling the feature on and off to see the visual difference. Bug Fixes: Fixed an issue in the CharStudio environment where the wireframe display would revert to a T-Pose when using "Select Faces" mode on a character with adjusted IK/FK poses. ===================================================== Thank you for your patience! KKBoneGen 2.0.0 update is now officially released. New Features: Dynamic Bone: A dynamic bone system similar to the game's native implementation. It allows added bones to have physical simulation effects. By default, it interacts with existing character colliders, but you can also generate new colliders via the plugin. Collider: You can now add colliders that interact with Dynamic Bones. These colliders can be attached to move with specific bones. In Studio mode, colliders can be added to map objects to interact with a character's Dynamic Bones. Preset: Easily copy Bone, Weight, Dynamic Bone, and Collider settings from one character to another. If weights are painted on clothing, ensure the target character has the same outfit equipped. Presets are exported as standalone files (.kkbg). Help Panel: Added a Help panel with brief explanations for the functions in each tab. Timeline Support: You can now set keyframes for the position, rotation, and scale of bones added by this plugin within the Timeline. Multi-language Support: Added UI support for Japanese, Korean, Traditional Chinese, and Simplified Chinese. Bug Fixes: Fixed an issue where the plugin was skipped in Koikatsu Party (Steam version). Fixed an issue where subdivision data would be lost after saving accessories without skinning. ===================================================== This is a KK/KKS plugin that allows you to add bones, paint weights, and increase polygon counts on characters and map objects (partial support). Installation: After extracting the zip file, copy the DLL file corresponding to your game into the BepInEx\plugins folder. Usage: Open the window using the shortcut key Shift + B. 1. Add Bones: 1.1. Switch the top tab to Bones. 1.2. If you are working with a character, select the parent bone where you want to attach the new bone from the Parent Bone list. If the object has no bones by default, simply select the object itself in the Parent Bone list. 1.3. Enter a name for the new bone in the Name input field. 1.4. Click the Add button to create the bone. 1.5. Use the controls in the lower panel to adjust the position, rotation, and scale of the new bone. 2. Weight Painting: 2.1. Switch the top tab to Weight Paint. 2.2. First, select the object you want to paint weights on from the Target Mesh list, then select a bone from the Paint Bone list. By default, only newly added bones are shown. To select an existing bone, enter the bone name in the Add Bone search field and click it to add it to the Paint Bone list. 2.3. Click the Enter Paint Mode button to enter weight painting mode. 2.4. While in weight painting mode, hold Ctrl and use the left/right mouse buttons to control the camera view. 2.5. There are two painting modes: brush mode and box selection mode. You can switch between them depending on the object. 2.6. In box selection mode, hold Shift + left mouse button to add vertices to the selection, or Alt + left mouse button to remove vertices from the selection. 2.7. Add: Increase weight value Sub: Decrease weight value Smooth: Average weight values between vertices Replace: Replace weight values 2.8. Brush Radius: Brush size Strength: Painting strength 2.9. Click the Exit Paint Mode button to leave weight painting mode. 3. Increase Polygon Count: 3.1. Switch the top tab to Weight Paint. 3.2. Select the object you want to increase polygon count for from the Target Mesh list. 3.3. Check Select Faces to enter face-selection subdivision mode. If unchecked, clicking Subdivide will subdivide the entire object. 3.4. While in face-selection subdivision mode, hold Ctrl and use the left/right mouse buttons to control the camera view. 3.5. There are two selection modes: brush mode and box selection mode. Switch between them as needed. 3.6. In box selection mode, hold Shift + left mouse button to add selections, or Alt + left mouse button to remove selections. 3.7. All: Select all faces None: Deselect all Invert: Invert selection (previously selected faces are deselected, and unselected faces are selected) 3.8. Level: Subdivision level (1–3). Higher values increase polygon count but also increase the workload for weight painting and system performance usage. It is recommended to start from level 1 and increase gradually. 3.9. Subdivide: Increase polygon count according to the selected level Restore: Restore the object to its original polygon count Important Note: If the Subdivide effect disappears after using Uncensor Selector to switch body types, please note that this is intended behavior. Although different body types may look identical, their vertex orders are different. Applying Subdivide directly across different meshes would cause mesh tearing (broken faces). To prevent this, the plugin’s safety mechanism will automatically reset the Subdivide state when a body type is switched. Known Issues: In KK, minor stuttering may occur while in painting mode. This is due to the older Unity version used by KK. Although optimizations have been applied, objects with very high polygon counts may still cause performance issues. In KKS, objects in the Sunshine Map do not support adding bones, weight painting, or polygon subdivision. KK default maps and third-party maps are theoretically supported. Q&A: Q: What is the relationship between bones and weights? Why is weight painting necessary after adding bones? A: You are recommended to first study Blender rigging tutorials to learn the basics of rigging. Q: Can CharaStudio only add bones, paint weights, and subdivide polygons on map objects? A: These operations can also be performed on characters. Q: Why do weights break if I increase polygon count after painting weights? A: Because the vertex order of the object has changed. The correct workflow is to increase the polygon count first, and then perform weight painting.
アップデート履歴/Update informations
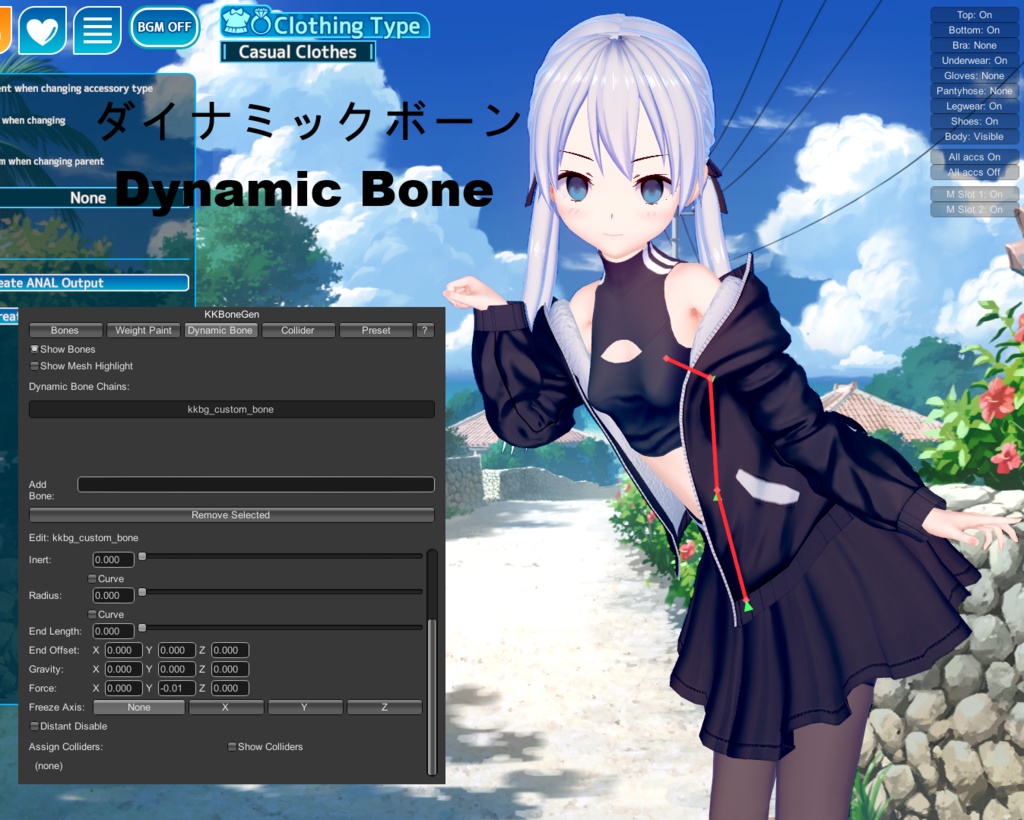
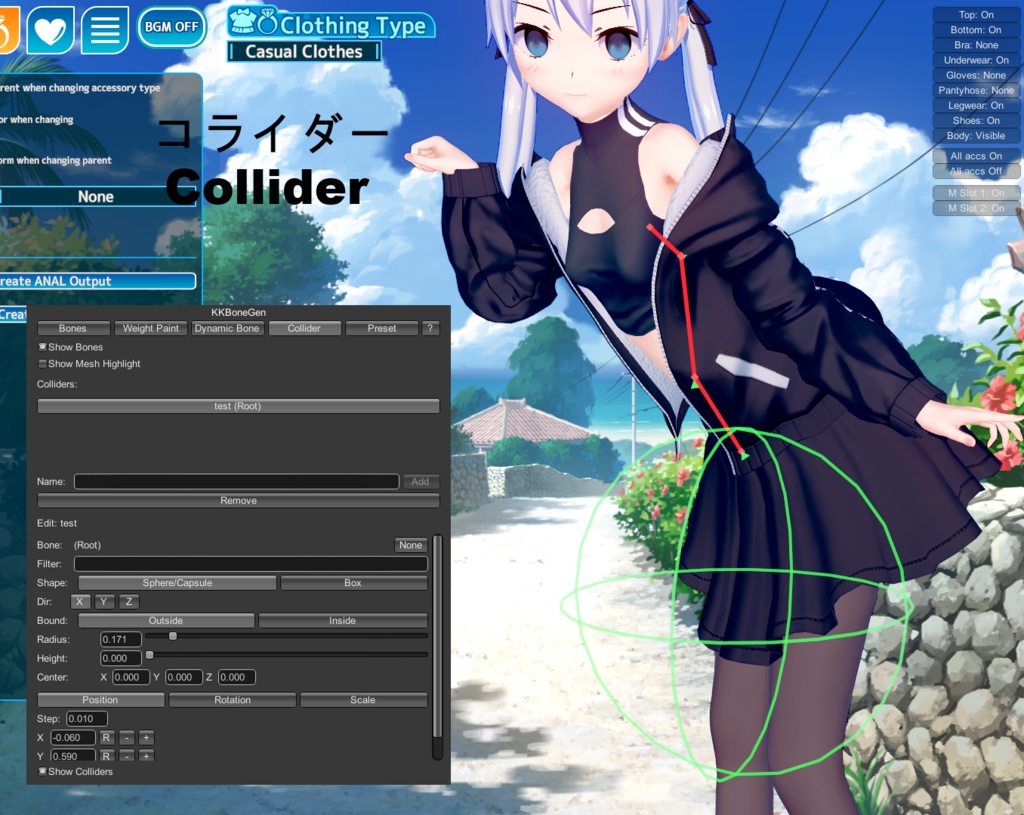
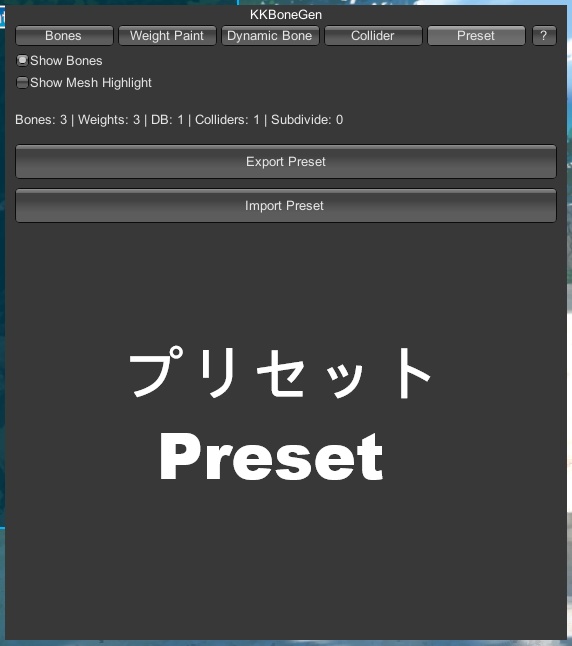
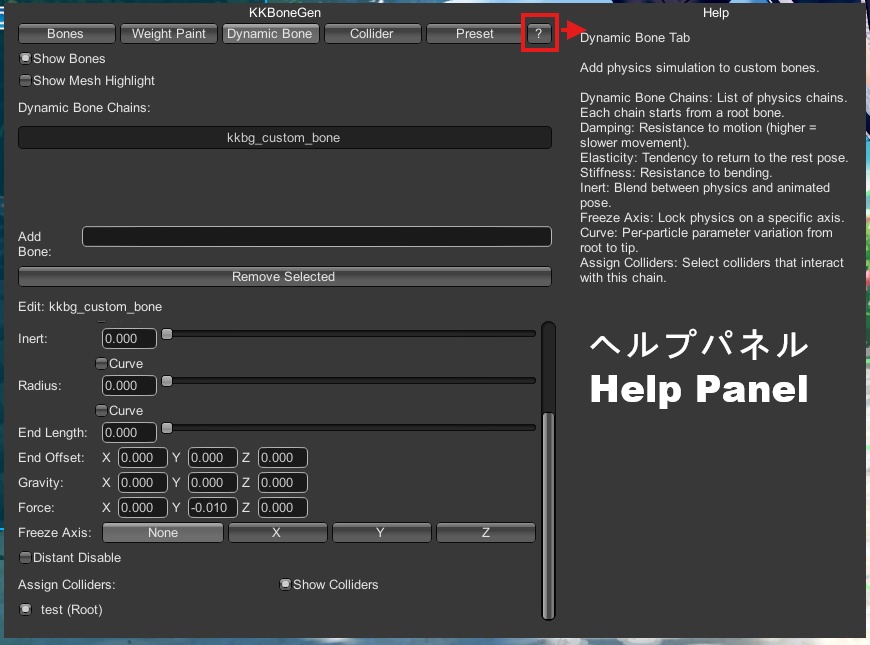
[2026-03-28: v2.0.1] 主な更新内容:ウェイトペイント機能の強化 Undo/Redo(元に戻す/やり直し): ウェイトペイント中に操作を取り消したり、やり直したりできるようになりました。 ショートカットキー:Ctrl + Z (Undo) | Ctrl + Y (Redo) Reset(リセット): すべてのウェイトをクリアしたい場合、ボタン一つで実行可能になりました。 Paint Through(透過ペイント): この機能を有効にすると、ブラシがメッシュを突き抜けて背面の頂点にもウェイトを塗ることができます。 Normal Falloff(法線減衰): 有効にすると、広範囲をペイントする際にオブジェクトの背面が塗られないよう保護されます。言葉では説明しづらいですが、オン/オフを切り替えて描画結果の差を確認してみてください。 修正済みバグ: CharStudio 環境において、IK/FK でポーズを変更したキャラクターに対し「Select Faces」モードを使用すると、ワイヤーフレームの表示が T-Pose に戻ってしまう不具合を修正しました。 [2026-03-14: v2.0.0] 追加機能: Dynamic Bone: ゲーム標準の Dynamic Bone と同様の動態ボーンシステムです。追加したボーンに物理シミュレーションを適用できます。デフォルトでキャラクター既存のコライダーと反応するほか、本プラグインで新しいコライダーを作成して干渉させることも可能です。 Collider: Dynamic Bone と相互作用するコライダーを追加できます。コライダーはボーンに追従させることが可能です。Studio モードでは、マップオブジェクトにコライダーを追加し、キャラの Dynamic Bone と反応させることもできます。 Preset: キャラクターのボーン、ウェイト、Dynamic Bone、コライダー設定を別のキャラへ簡単にコピーできます。衣装に塗られたウェイトが含まれる場合、コピー先も同じ衣装を着用している必要があります。書き出し形式は独自形式(.kkbg)です。 Help パネル: 各タブの機能を簡潔に説明するヘルプパネルを追加しました。 Timeline サポート: Timeline 上で、本プラグインで追加したボーンの移動・回転・スケールのキーフレーム設定が可能になりました。 多言語対応: UI 表示に日本語、韓国語、繁体字、簡体字を追加しました。 修正点: Koikatsu Party (Steam版) でプラグインがスキップされる問題を修正。 Skin のないアクセサリを保存した際、サブディビジョン(細分化)データが消失する問題を修正。 [2026-02-20: v1.0.1] 修正内容 (Bug Fixes): キャラクターの体に Subdivide を適用した後、キャラカードを保存して再読み込みすると、Subdivide の状態が消失してしまう不具合を修正しました。 UI 関連: 複数の編集モードを同時に起動してゲームがフリーズするのを防ぐため、ボタンに誤操作防止機能を追加しました。 Target Mesh リストに検索バーを追加しました。 その他: 編集モードの最適化を行いました。 [2026-02-18: v1.0] First Release