
VRoid Heartbeat Hoodie & Capri Set
- Custom Vroid Heart OutfitDigital250 JPY
- Custom Vroid & Photoshop BundleDigital450 JPY
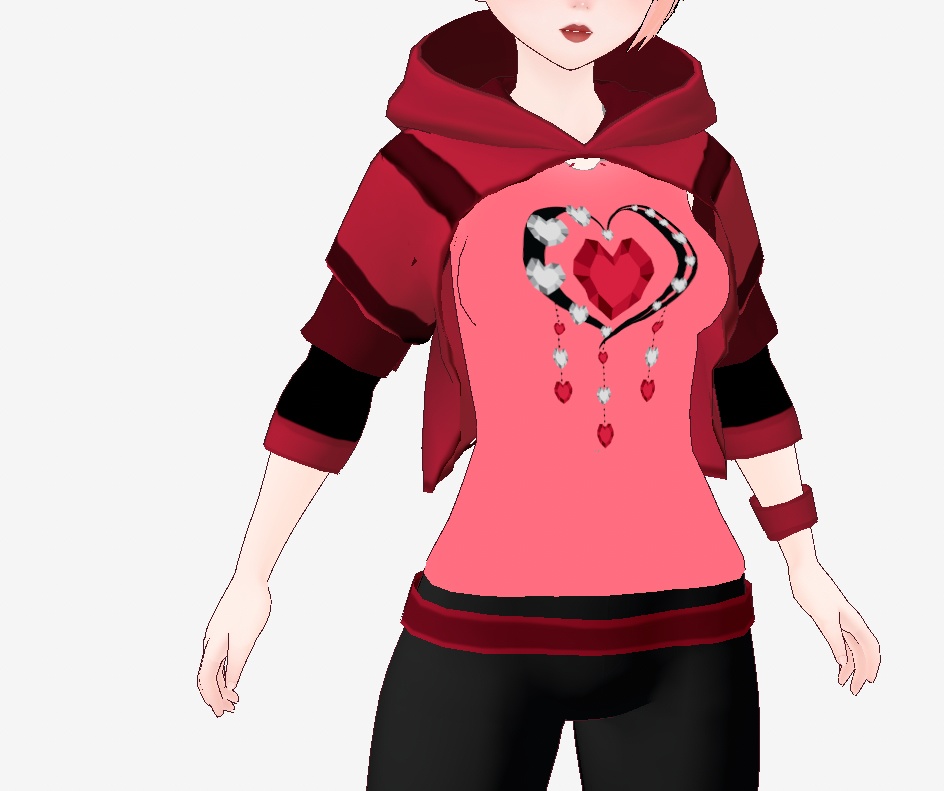
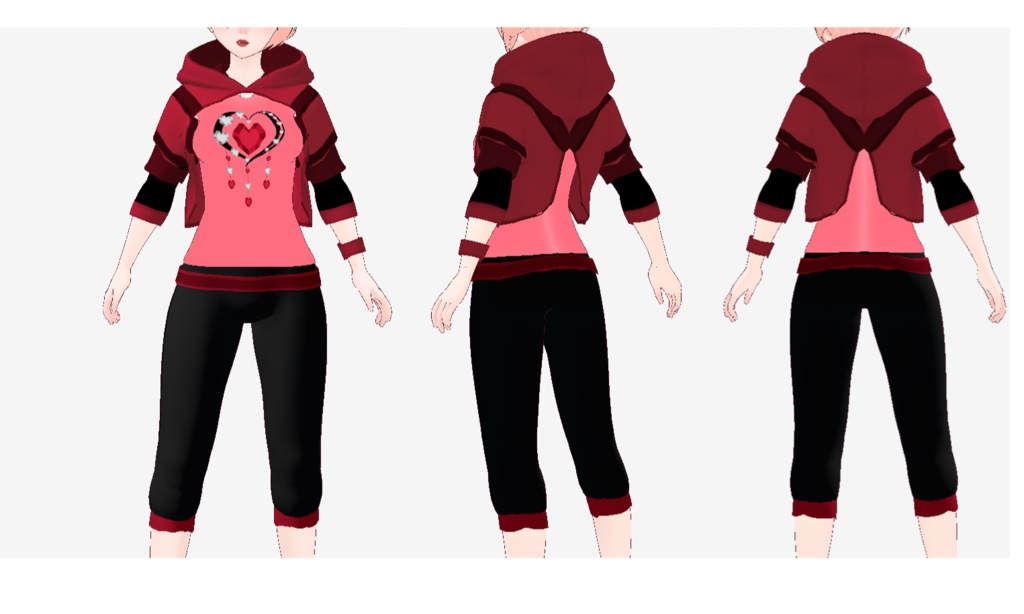
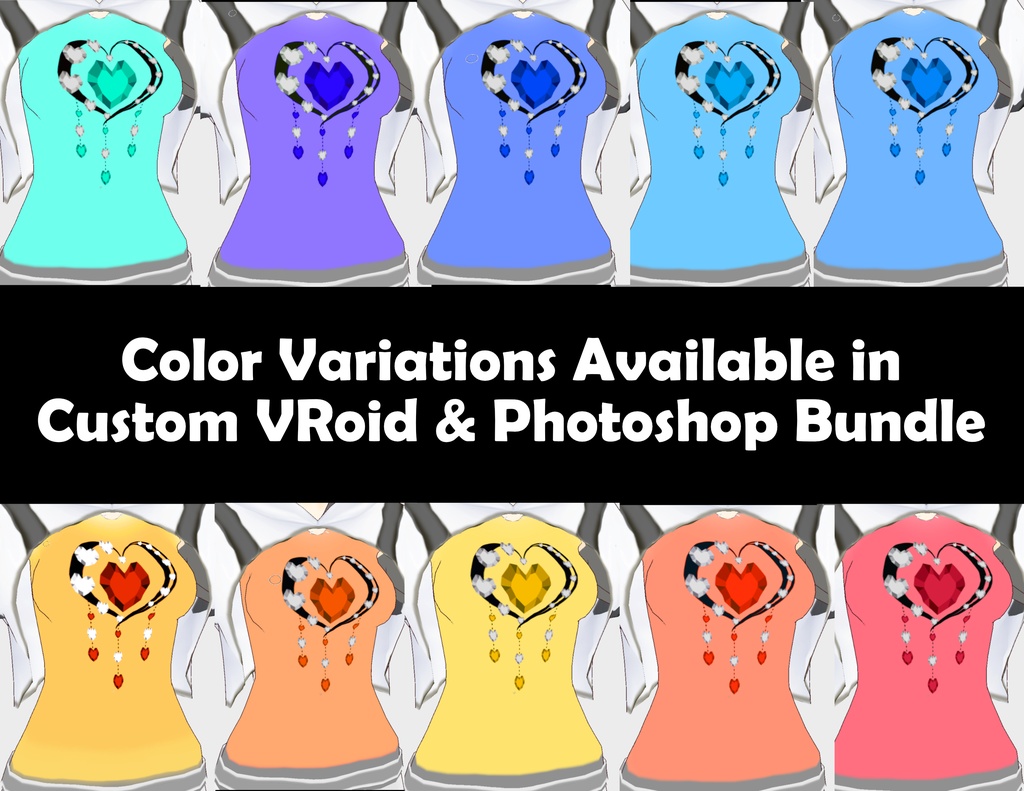


🔥 VRoid Heartbeat Hoodie & Capri Set – Customizable & Creative! 🔥 Bring your avatar to life with this pink t-shirt layered under a bold red split-back hoodie, paired with sleek black capris and red accents. Perfect for standing out, if you purchase the full custom bundle set, you'll also be able to unleash your creativity with customizable Photoshop files for the t-shirt design! 🌟 Features: Front: Pink t-shirt with a heart-and-dreamcatcher graphic. Back: Red split-hood design for added style. Sleeves: Layered red cuffs for a trendy look. Bottoms: Black capris with matching red accents. Customizable: Recolor the hoodie and pants (To create your own t-shirt designs with the included Photoshop file as shown above, purchase the bundle)! 𝐂𝐮𝐬𝐭𝐨𝐦 𝐕𝐫𝐨𝐢𝐝 & 𝐏𝐡𝐨𝐭𝐨𝐬𝐡𝐨𝐩 𝐁𝐮𝐧𝐝𝐥𝐞 𝐈𝐍𝐂𝐋𝐔𝐃𝐄𝐒 𝐚𝐥𝐥 𝐇𝐞𝐚𝐫𝐭 𝐒𝐡𝐢𝐫𝐭 𝐂𝐨𝐥𝐨𝐫 𝐎𝐩𝐭𝐢𝐨𝐧𝐬! 🎮 Express yourself—grab this one-of-a-kind outfit today!
Quick Instructions to Import .vroidcustom Items into VRoid Studio
1. **Open VRoid Studio:** - Launch the app and open your avatar project. 2. **Navigate to the Custom Item Importer:** - Go to the "Clothing Editor" or relevant customization tab. 3. **Import the .vroidcustom File:** - Click the **"Import"** button and select the `.vroidcustom` file from your computer. 4. **Apply the Item:** - Once imported, the custom item will appear in your clothing list. Select it to apply it to your avatar. 5. **Adjust as Needed:** - Use VRoid's sliders or tools to tweak the fit or positioning of the item. 6. **Save Your Avatar:** - Save your changes or export your avatar with the new custom item. 💡 *Tip:* Ensure you have compatible VRoid Studio versions to avoid import issues!
How to Import Custom Design PNG Files into VRoid Shirts
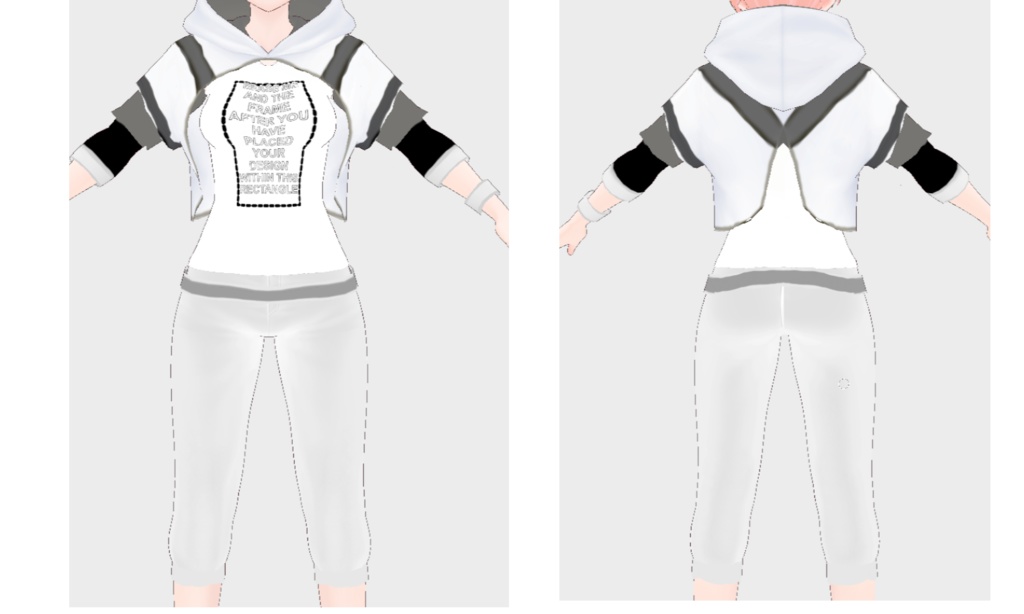
1. **Open the Clothing Editor:** - Launch VRoid Studio and navigate to the "Clothing Editor" tab. 2. **Select the Shirt Type:** - Assuming you've already imported the hoodie top, select the hoodie top, navigate to the customize option on the right, and click Edit Texture. 3. **Edit Texture:** - Go to the "Texture" tab within the Clothing Editor. - Right-click on the top body suit texture default layer and select **"Import"** from the menu. 4. **Import Your PNG File:** - Browse your computer for your custom PNG file and select it. 5. **Adjust and Preview:** - Preview your avatar to ensure the texture fits perfectly. 6. **Save Your Changes:** - Save your customized shirt by clicking "Save" or exporting it as part of your avatar model. 💡 *Tip:* If you want to create a completely new design, export the default texture as a guide, edit it in software like Photoshop, and re-import it into VRoid Studio.
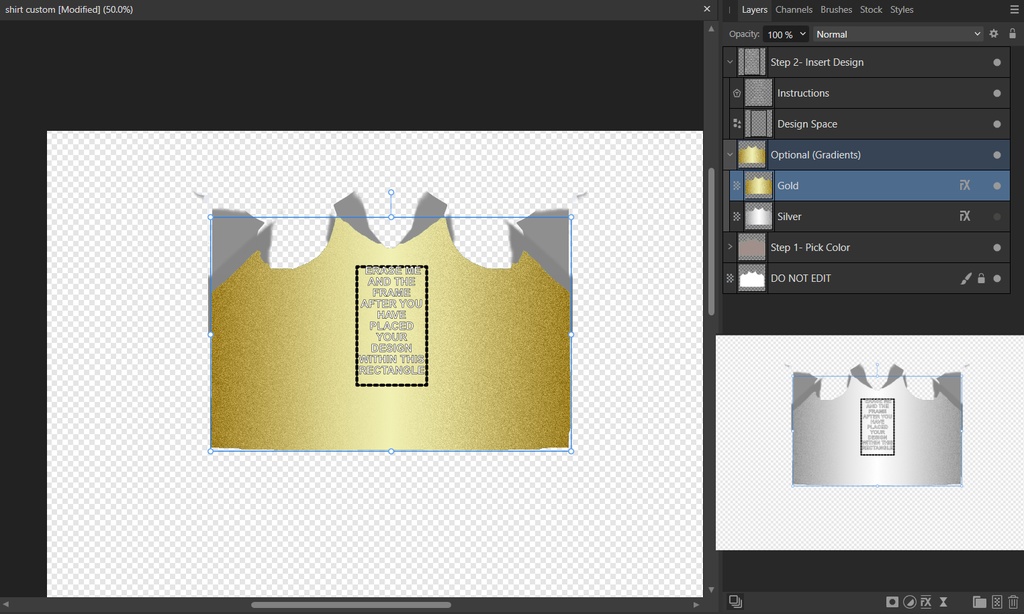
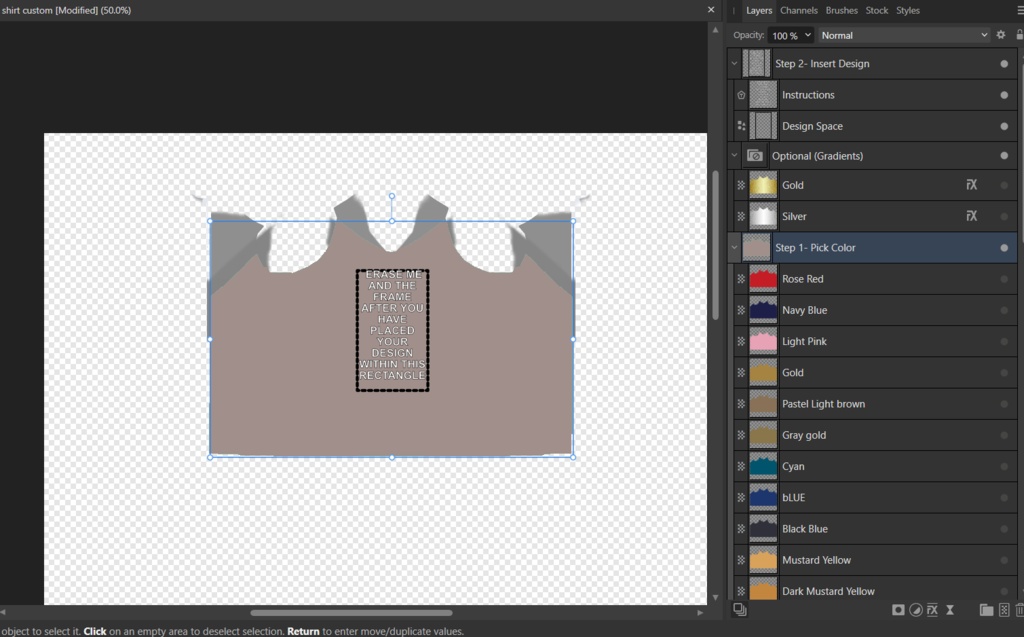
Detailed Instructions for Recoloring Items in VRoid Studio
Recoloring items in VRoid Studio allows you to customize your clothing's colors and patterns. Here's how to specifically recolor items like the hoodie, shirt, or pants shown in the images: --- #### 1. Open VRoid Studio - Launch VRoid Studio and open your avatar project. --- #### 2. Navigate to the Clothing Editor - Go to the **"Clothing Editor"** tab on the left. - Select the clothing item you want to recolor (e.g., hoodie, shirt, or pants). --- #### 3. Access the Texture Tab - Click on the **"Texture"** section for the selected item. - You will see a preview of the texture map for that clothing piece. --- #### 4. Export the Texture - Click **"Export"** to save the texture as a PNG file to your computer. - This allows you to edit it in external software like Photoshop, GIMP, or Canva. --- #### 5. Edit in an External Program - Open the exported PNG in an image-editing program. - Use tools like: - **Brushes or Fill Tool**: Change specific colors (e.g., make the pink shirt a different shade). - **Hue/Saturation Adjustment**: Adjust overall tones (e.g., modify red tones of the hoodie). - **Gradient Tool**: Add smooth color transitions for a unique look. - Save your edited design as a PNG file with transparency preserved. --- #### 6. Re-import the Edited Texture - Return to VRoid Studio and go back to the texture tab for your selected item. - Click **"Import"**, then upload your edited PNG file. --- #### 7. Adjust Colors Directly in VRoid (Optional) - For quick recoloring without external editing: - Use VRoid's built-in color sliders under the "Material" tab. - Adjust base colors, highlights, and shadows directly within VRoid. --- #### 8. Preview and Fine-tune - Check how your new colors look on your avatar using the 3D preview. - Use scaling and positioning tools if necessary to align patterns or designs. --- #### 9. Save Your Changes - Once satisfied with the recolor, save your project. - Export your updated avatar if needed. --- 💡 *Tips for Best Results:* - Use layers in editing software to preserve details like seams and folds while recoloring. - Keep a backup of the original texture file for easy reversion if needed. With these steps, you can easily recolor items like hoodies, shirts, or pants and make them uniquely yours!
To use .customvroiditem files for VRChat avatars, follow these detailed instructions:
## 1. Prepare Your VRoid Studio Avatar 1. Open VRoid Studio and create or load your base avatar. 2. Ensure your avatar is fully designed and ready for customization. ## 2. Import .customvroiditem Files 1. In VRoid Studio, locate the "Import" option in the main menu. 2. Select the .customvroiditem file you want to use. 3. The custom item will appear in your VRoid Studio inventory. ## 3. Apply Custom Items to Your Avatar 1. Navigate to the appropriate section in VRoid Studio (e.g., Clothing, Accessories). 2. Find the imported custom item in your inventory. 3. Click on the item to apply it to your avatar. 4. Adjust the item's position, size, and other properties as needed. ## 4. Export Your Avatar 1. Once satisfied with the customizations, export your avatar as a .vrm file. 2. Save the .vrm file in an easily accessible location. ## 5. Set Up Unity and VRChat SDK 1. Install Unity 2022.3.22f1 (the version compatible with current VRChat SDK)[4]. 2. Download and install the VRChat Creator Companion (VCC)[4]. 3. Use VCC to create a new VRChat avatar project[4]. ## 6. Import VRM Converter for VRChat 1. In your Unity project, go to the Package Manager. 2. Search for and import the "VRM Converter for VRChat" package[4][5]. ## 7. Convert Your VRoid Avatar 1. In Unity, navigate to "VRM0" in the top menu. 2. Click "Import" and select your .vrm file. 3. Once imported, select your avatar in the Project window. 4. Go back to "VRM0" and click "Duplicate and Convert for VRChat"[4]. 5. Save the converted avatar when prompted. ## 8. Configure Avatar Settings 1. Select your converted avatar in the Hierarchy window. 2. In the Inspector, locate the "VRC Avatar Descriptor" component. 3. Adjust the View Position to align with your avatar's eyes[7]. 4. Configure any other necessary VRChat-specific settings. ## 9. Upload Your Avatar 1. Open the VRChat SDK Control Panel in Unity. 2. Ensure all required components are set up correctly. 3. Click "Build & Publish" in the control panel[1]. 4. Name your avatar and complete the upload process. ## Additional Tips - If you need to make further adjustments to custom items, use the Unity Editor expansion pack to modify model data and costume data[2]. - Utilize the fitting feature in VRoid Studio to adjust costumes for different body types[2].
𝙏𝙚𝙧𝙢𝙨 𝙤𝙛 𝙎𝙚𝙧𝙫𝙞𝙘𝙚 𝙛𝙤𝙧 𝙑𝙍𝙤𝙞𝙙 𝙋𝙧𝙤𝙙𝙪𝙘𝙩𝙨
Please carefully review the terms of service below before purchasing. By purchasing, you agree to these terms: 𝗨𝘀𝗮𝗴𝗲 𝗥𝗶𝗴𝗵𝘁𝘀 Personal Commercial Use: Allowed for a single owner per purchase. One Purchase, One Owner: Each purchase grants usage rights to one individual for most commercial purposes. 𝗖𝗿𝗲𝗱𝗶𝘁 Not Required but Appreciated: While crediting the creator (LadyLuck/LadyEstellaRose) is not mandatory, it is always appreciated when possible! 𝗔𝗹𝗹𝗼𝘄𝗲𝗱 𝗨𝘀𝗲𝘀 ✅ Streaming: Use the product on a model while streaming on platforms like Twitch or YouTube Live. ✅ YouTube Content: Feature the product on a model in videos for YouTube or other video-sharing platforms. ✅ VRChat Play & Private Use: Use the product on a model for personal VRChat avatars and private use. ✅ Alterations for Personal Use: Modify or alter the product to better suit your personal needs on a model. 𝗣𝗿𝗼𝗵𝗶𝗯𝗶𝘁𝗲𝗱 𝗨𝘀𝗲𝘀 🚫 Reselling: You may not resell the product, whether altered or unaltered. 🚫 False Attribution: Do not claim that you or anyone else created the product. Credit must remain with the original creator, LadyLuck/LadyEstellaRose. 🚫 Redistribution Without Purchase: Sharing or redistributing the product to others for commercial use without purchase is strictly prohibited. 🚫 Public Access Models: Do not make models with this product publicly downloadable, including public VRChat avatars or VRoid Hub models. 🚫 Immoral or Slanderous Use: The product may not be used for any purpose that harms others or promotes slanderous behavior. 𝗢𝘄𝗻𝗲𝗿𝘀𝗵𝗶𝗽 𝗮𝗻𝗱 𝗥𝗲𝗳𝘂𝗻𝗱 𝗣𝗼𝗹𝗶𝗰𝘆 All rights to the products sold remain with AureliaBoutique/LadyEstellaRose. No Refunds: Due to the digital nature of these products, refunds are not available after purchase. 𝗖𝗼𝗻𝘁𝗮𝗰𝘁 𝗜𝗻𝗳𝗼𝗿𝗺𝗮𝘁𝗶𝗼𝗻 If you have any questions or need assistance, feel free to reach out! I’m happy to help with custom VRoid fashion tailored just for you. 📱 Cluster & LINE Messaging Username: AureliaBoutique / LadyEstellaRose 𝙏𝙝𝙖𝙣𝙠 𝙮𝙤𝙪 𝙛𝙤𝙧 𝙨𝙪𝙥𝙥𝙤𝙧𝙩𝙞𝙣𝙜 𝙢𝙮 𝙬𝙤𝙧𝙠 𝙖𝙣𝙙 𝙧𝙚𝙨𝙥𝙚𝙘𝙩𝙞𝙣𝙜 𝙩𝙝𝙚𝙨𝙚 𝙩𝙚𝙧𝙢𝙨! 💖
𝗡𝗲𝗲𝗱 𝗛𝗲𝗹𝗽? 𝗛𝗲𝗿𝗲’𝘀 𝗛𝗼𝘄 𝘁𝗼 𝗥𝗲𝗮𝗰𝗵 𝗢𝘂𝘁! 😊
If you’re experiencing any issues with my VRoid products, don’t worry—I’m here to help! To make the process as smooth as possible, please follow the steps below when contacting me: 1. Share a Screenshot 📸 Please include a clear screenshot of the part of the product you’re having trouble with in VRoid Studio. Let me know what you’re trying to accomplish so I can better understand the issue. 2. Tell Me What You’ve Tried 🛠️ Let me know the steps you’ve already taken to try and fix the problem. This helps me avoid suggesting things you’ve already done! 3. Be Patient While I Fix It 🕒 If it turns out the issue is something I need to fix on my end, I’ll get to work right away. Please allow 2-3 business days for me to send you a repaired file. Feel free to reach out anytime—I’m happy to assist and ensure your experience with my products is as enjoyable as possible! 💖