
【半額セール】OBS Master Control ・ OBSに音声マスターチャンネルを追加できるプラグイン
- ダウンロード商品¥ 500
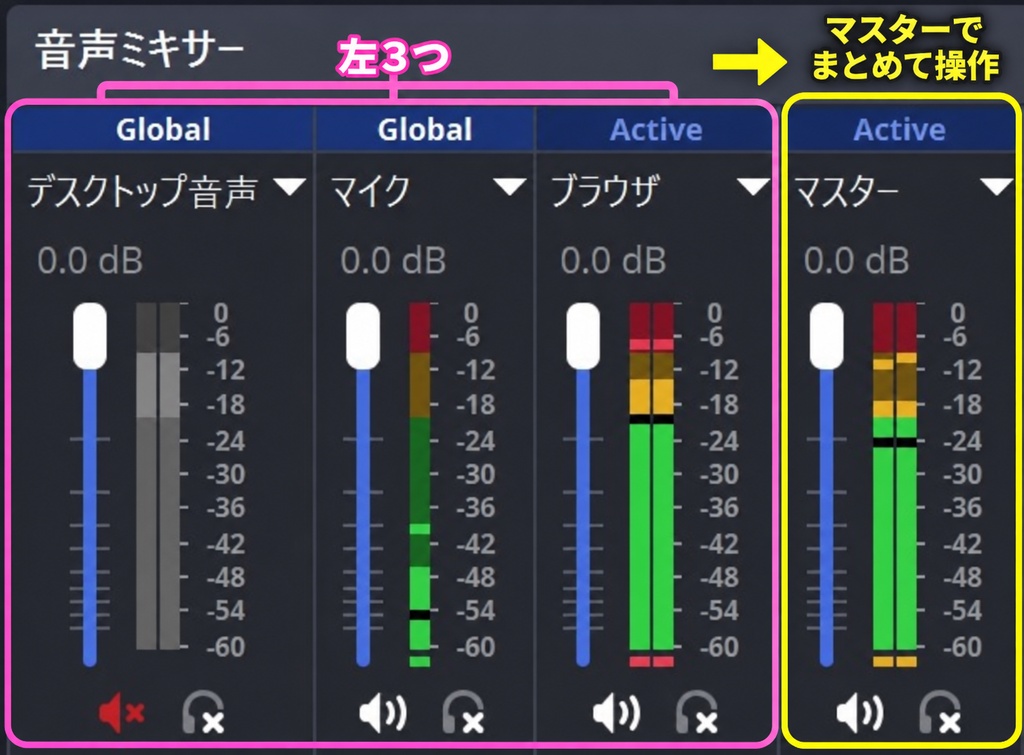

OBS では通常、マイクや BGM など個別の音声ソースにフィルタをかけることはできますが、 配信・録画に出力される音声全体にまとめてフィルタをかけることはできません。 OBS Master Control をインストールすると、音声ミキサーに「マスター」が追加されます。 この「マスター」にフィルタを設定することで、各ソースをミックスしたあとの音声全体に エフェクトをかけられるようになります。 使い方は通常の音声ソースとほぼ同じです。 OBS 標準のコンプレッサーやリミッターなどを、「マスター」のフィルタ画面から そのまま追加できます。追加のソフトウェアは必要ありません。 マスター出力にコンプレッサーやリミッターをかけることで、マイクや BGM を個別に 処理するだけでは調整しきれない、配信全体の音量をまとめて整えることができます。 たとえば、マイクと BGM にそれぞれリミッターを設定していても、両方が同時に鳴れば 最終的な音量は大きくなります。 ミックス後の音声にリミッターをかけることで、配信・録画へ送られる最終的な音量を まとめて制御できます。 In OBS you can apply filters to individual audio sources such as a microphone or background music, but there is no way to apply a filter to the whole audio output that goes to your stream and recording. When you install OBS Master Control, a "Master" entry is added to the Audio Mixer. By setting filters on this "Master", you can apply effects to the entire audio after all sources have been mixed together. It works almost the same way as a normal audio source. OBS's built-in compressor, limiter and other filters can be added directly from the "Master" filter dialog. No additional software is required. Applying a compressor or limiter at the master output lets you control the loudness of the whole stream, which cannot be fully achieved by processing the microphone and background music individually. For example, even if you set a limiter on both the microphone and the background music, the final level still rises when the two play at the same time. Applying a limiter to the mixed audio lets you control the final level sent to your stream and recording as a whole.
README
================================================================================ OBS Master Control v1.0.0 OBS の配信・録画音声全体に、OBS 標準の音声フィルタを適用するプラグイン ================================================================================ Copyright (C) 2026 MouseSoft -------------------------------------------------------------------------------- 概要 -------------------------------------------------------------------------------- OBS では通常、マイクや BGM など個別の音声ソースにフィルタをかけることはできますが、 配信・録画に出力される音声全体にまとめてフィルタをかけることはできません。 OBS Master Control をインストールすると、音声ミキサーに「マスター」が追加されます。 この「マスター」にフィルタを設定することで、各ソースをミックスしたあとの音声全体に エフェクトをかけられるようになります。 使い方は通常の音声ソースとほぼ同じです。 OBS 標準のコンプレッサーやリミッターなどを、「マスター」のフィルタ画面から そのまま追加できます。追加のソフトウェアは必要ありません。 マスター出力にコンプレッサーやリミッターをかけることで、マイクや BGM を個別に 処理するだけでは調整しきれない、配信全体の音量をまとめて整えることができます。 たとえば、マイクと BGM にそれぞれリミッターを設定していても、両方が同時に鳴れば 最終的な音量は大きくなります。 ミックス後の音声にリミッターをかけることで、配信・録画へ送られる最終的な音量を まとめて制御できます。 -------------------------------------------------------------------------------- マスターで使用できるフィルタ -------------------------------------------------------------------------------- OBS に標準搭載されている音声フィルタを、そのまま使用できます。 OBS 標準の「VST 2.x プラグイン」フィルタも使用できます。 お手持ちの VST プラグインを使用する場合は、こちらから読み込んでください。 ※ VST プラグイン本体は付属していません。 -------------------------------------------------------------------------------- 動作環境 -------------------------------------------------------------------------------- OBS Studio 32.1.1 以降(64 ビット版) OS Windows 10 / 11(64 ビット) Linux版、Mac版は無償でのベータテスター募集を行っております。Twitter:@mouse_soft_yまでご連絡ください。 OBS 標準フィルタのみを使用する場合、追加のソフトウェアは必要ありません。 -------------------------------------------------------------------------------- インストール -------------------------------------------------------------------------------- 1. OBS を終了します。 2. インストーラーを実行します。 3. OBS を起動します。 以上でインストールは完了です。 特別な初期設定は必要ありません。 -------------------------------------------------------------------------------- 使い方 -------------------------------------------------------------------------------- ■ マスターにフィルタを追加する 1. 音声ミキサーに「マスター」が表示されていることを確認します。 2. 「マスター」の歯車ボタンを押し、「フィルタ」を開きます。 3. 左下の「+」を押し、使用するフィルタを選択します。 通常の音声ソースにフィルタを追加するときと同じ操作です。 追加したフィルタは、配信・録画へ出力される音声全体に適用されます。 ■ VST プラグインを使用する フィルタの追加画面で「VST 2.x プラグイン」を選択し、 表示された画面から使用する VST プラグインを指定します。 ■ 音量・ミュート・モニタリング 音声ミキサーに表示される「マスター」は、ほかの音声ソースと同じように操作できます。 ■ 設定を変更する 「マスター」の歯車ボタンから「プロパティ」を開きます。 マスターにエフェクトをかける マスター処理のオン / オフ トゥルーピーク メーターの表示方式を切り替える 0 dBFS 超も表示する 0 dBFS を超えたピークもメーターに表示する ■ マスター処理を一時的に無効にする 「マスターにエフェクトをかける」のチェックを外してください。 マスター処理が無効になり、変更されていた音声トラックの割り当ても元に戻ります。 再び有効にする場合は、OBS のメニューから 「ツール」→「マスターコントロールの設定」 を開き、「マスターにエフェクトをかける」にチェックを入れてください。 -------------------------------------------------------------------------------- 使用上の注意 -------------------------------------------------------------------------------- ■ 約 21 ミリ秒の音声遅延が発生します OBS の音声処理の仕様上、マスター処理を有効にすると約 21 ミリ秒の遅延が発生します。 この遅延をなくすことはできません。 映像とのずれが気になる場合は、OBS 側で映像に遅延を設定して調整してください。 ■ 音声トラックを 1 本使用します 内部処理のため、OBS の音声トラックを 1 本使用します。 空いているトラックがある場合は、自動的にそのトラックを使用します。 6 トラックすべてが使用されている場合は、そのうち 1 トラックを内部処理用として 使用します。 ■ 各ソースのトラック割り当てが変更されます マスター処理を行うため、配信トラックへ直接出力されていた音声ソースを、 内部処理用のトラックへ一時的に移動します。 この処理はプラグインが自動で行うため、OBS 側で手動設定する必要はありません。 「マスターにエフェクトをかける」をオフにすると、トラックの割り当ては元に戻ります。 ■ 音が二重に聞こえる場合 元の音声ソースで「音声モニタリング」が有効になっていると、 フィルタ適用前の音と適用後の音が同時に再生され、二重に聞こえる場合があります。 その場合は、元の音声ソース側のモニタリングを無効にしてください。 ■ VST プラグインを使用する場合 ・使用できるのは VST 2.x プラグインです。 ・32 ビット版の VST プラグインは使用できません。 64 ビット版 OBS Studio が 32 ビット版 VST を読み込めないためであり、 OBS Master Control 固有の制限ではありません。 ・VST プラグイン内部で発生する遅延の補正は行いません。 先読み処理を行うリミッターやマキシマイザーなどを使用した場合、 その分だけ映像とのずれが大きくなります。 -------------------------------------------------------------------------------- アンインストール -------------------------------------------------------------------------------- 1. OBS を終了します。 2. Windows の「設定」→「アプリ」から「OBS Master Control」をアンインストールします。 アンインストールする前に「マスターにエフェクトをかける」をオフにし、 音声トラックの割り当てを元に戻しておくことをおすすめします。 -------------------------------------------------------------------------------- トラブルシューティング -------------------------------------------------------------------------------- ■ 音声ミキサーに「マスター」が表示されない まず OBS を再起動してください。 それでも表示されない場合は、OBS の「ツール」メニューに 「マスターコントロールの設定」が表示されているか確認してください。 項目自体が表示されていない場合は、プラグインが正常に読み込まれていない可能性が あります。次のフォルダーにプラグインのファイルが存在するか確認してください。 C:\ProgramData\obs-studio\plugins\obs-master-control\bin\64bit\ ■ 使用したいフィルタが一覧に表示されない コンプレッサーなどの OBS 標準フィルタが表示されない場合は、 OBS Studio が正常にインストールされていない可能性があります。 VST プラグインが表示されない場合は、以下を確認してください。 ・64 ビット版の VST プラグインであること ・OBS が検索する VST プラグインのフォルダーにインストールされていること ■ 音が出なくなった 「マスター」の歯車ボタンから「プロパティ」を開き、 「マスターにエフェクトをかける」のチェックを外してください。 マスター処理が無効になり、元の音声出力に戻ります。 ■ プラグインが正常に動作しているか確認したい OBS のメニューから 「ヘルプ」→「ログファイル」→「現在のログファイルを表示」 を開いてください。 ログ内の [obs-master-control] で始まる行に、プラグインの動作状況が記録されています。 -------------------------------------------------------------------------------- Copyright (C) 2026 MouseSoft ================================================================================
README English
================================================================================ OBS Master Control v1.0.0 Apply OBS's built-in audio filters to your entire stream and recording audio ================================================================================ Copyright (C) 2026 MouseSoft -------------------------------------------------------------------------------- Overview -------------------------------------------------------------------------------- In OBS you can apply filters to individual audio sources such as a microphone or background music, but there is no way to apply a filter to the whole audio output that goes to your stream and recording. When you install OBS Master Control, a "Master" entry is added to the Audio Mixer. By setting filters on this "Master", you can apply effects to the entire audio after all sources have been mixed together. It works almost the same way as a normal audio source. OBS's built-in compressor, limiter and other filters can be added directly from the "Master" filter dialog. No additional software is required. Applying a compressor or limiter at the master output lets you control the loudness of the whole stream, which cannot be fully achieved by processing the microphone and background music individually. For example, even if you set a limiter on both the microphone and the background music, the final level still rises when the two play at the same time. Applying a limiter to the mixed audio lets you control the final level sent to your stream and recording as a whole. -------------------------------------------------------------------------------- Filters available on the Master -------------------------------------------------------------------------------- The audio filters that come with OBS can be used as they are. The OBS "VST 2.x Plug-in" filter can be used as well. To use a VST plug-in of your own, load it from there. * VST plug-ins themselves are not included. -------------------------------------------------------------------------------- System requirements -------------------------------------------------------------------------------- OBS Studio 32.1.1 or later (64-bit) OS Windows 10 / 11 (64-bit) Beta testers for the Linux and macOS builds are wanted, free of charge. Please get in touch on Twitter: @mouse_soft_y If you only use the built-in OBS filters, no additional software is required. -------------------------------------------------------------------------------- Installation -------------------------------------------------------------------------------- 1. Close OBS. 2. Run the installer. 3. Start OBS. That completes the installation. No special initial setup is required. -------------------------------------------------------------------------------- How to use -------------------------------------------------------------------------------- - Adding a filter to the Master 1. Check that "Master" is shown in the Audio Mixer. 2. Click the gear button on "Master" and open "Filters". 3. Click "+" at the bottom left and select the filter you want to use. This is the same operation as adding a filter to a normal audio source. The filters you add are applied to the entire audio sent to your stream and recording. - Using a VST plug-in In the filter dialog, select "VST 2.x Plug-in", then specify the VST plug-in you want to use in the panel that appears. - Volume, mute and monitoring The "Master" shown in the Audio Mixer can be operated just like any other audio source. - Changing the settings Click the gear button on "Master" and open "Properties". Apply effects to the master Turns master processing on and off True peak Switches how the meter reads levels Show levels above 0 dBFS Shows peaks above 0 dBFS on the meter - Temporarily disabling master processing Clear the "Apply effects to the master" checkbox. Master processing is disabled, and the audio track assignments that were changed are restored to their original state. To enable it again, open "Tools" > "Master Control settings" from the OBS menu and tick "Apply effects to the master". -------------------------------------------------------------------------------- Notes on use -------------------------------------------------------------------------------- - An audio delay of about 21 milliseconds occurs Because of how OBS processes audio, enabling master processing introduces a delay of about 21 milliseconds. This delay cannot be removed. If the offset from the video bothers you, set a matching delay on the video in OBS. - One audio track is used One OBS audio track is used for internal processing. If a track is free, it is selected automatically. If all six tracks are in use, one of them is taken for internal processing. - The track assignments of your sources are changed To perform master processing, audio sources that were output directly to the streaming track are moved to the internal processing track. The plugin does this automatically, so no manual configuration is needed in OBS. Turning off "Apply effects to the master" restores the original track assignments. - If the audio is heard twice If "Audio Monitoring" is enabled on the original audio source, the audio before filtering and the audio after filtering are played at the same time, so you may hear it twice. In that case, disable monitoring on the original audio source. - When using VST plug-ins - Only VST 2.x plug-ins can be used. - 32-bit VST plug-ins cannot be used. This is because 64-bit OBS Studio cannot load 32-bit VST plug-ins, and is not a limitation specific to OBS Master Control. - Latency occurring inside a VST plug-in is not compensated. If you use a limiter or maximizer that performs look-ahead processing, the offset from the video grows accordingly. -------------------------------------------------------------------------------- Uninstalling -------------------------------------------------------------------------------- 1. Close OBS. 2. Uninstall "OBS Master Control" from "Settings" > "Apps" in Windows. Before uninstalling, we recommend turning off "Apply effects to the master" so that the audio track assignments are restored to their original state. -------------------------------------------------------------------------------- Troubleshooting -------------------------------------------------------------------------------- - "Master" is not shown in the Audio Mixer First, restart OBS. If it is still not shown, check whether "Master Control settings" appears in the OBS "Tools" menu. If the item itself is not there, the plugin may not have loaded correctly. Check that the plugin files exist in the following folder. C:\ProgramData\obs-studio\plugins\obs-master-control\bin\64bit\ - The filter you want is not shown in the list If OBS built-in filters such as the compressor are not shown, OBS Studio itself may not be installed correctly. If a VST plug-in is not shown, check the following. - That it is a 64-bit VST plug-in - That it is installed in a folder where OBS searches for VST plug-ins - No audio is output any more Click the gear button on "Master", open "Properties" and clear the "Apply effects to the master" checkbox. Master processing is disabled and the original audio output is restored. - Checking whether the plugin is working correctly From the OBS menu, open "Help" > "Log Files" > "View Current Log" Lines in the log beginning with [obs-master-control] record the operating status of the plugin. -------------------------------------------------------------------------------- Copyright (C) 2026 MouseSoft ================================================================================