Universal Output Transform|DaVinci Resolve 用 出力変換DCTL(ACES 2.0 色域圧縮・11カメラ対応)
- Digital6,800 JPY


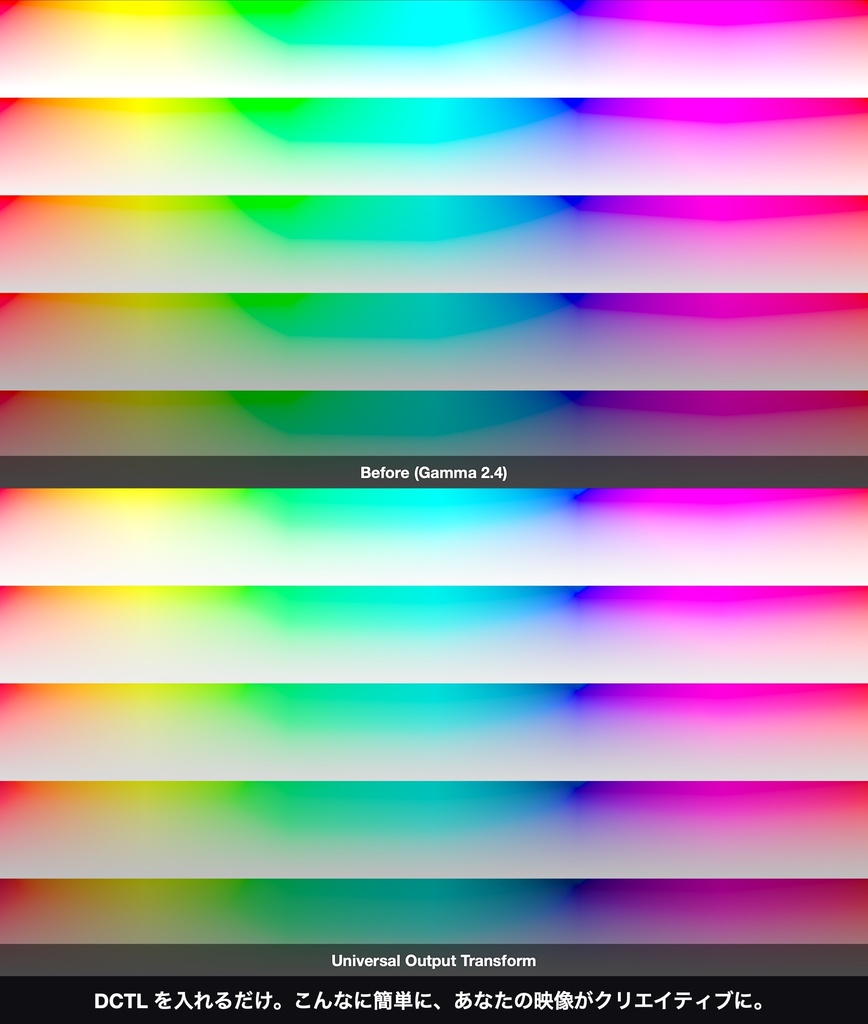
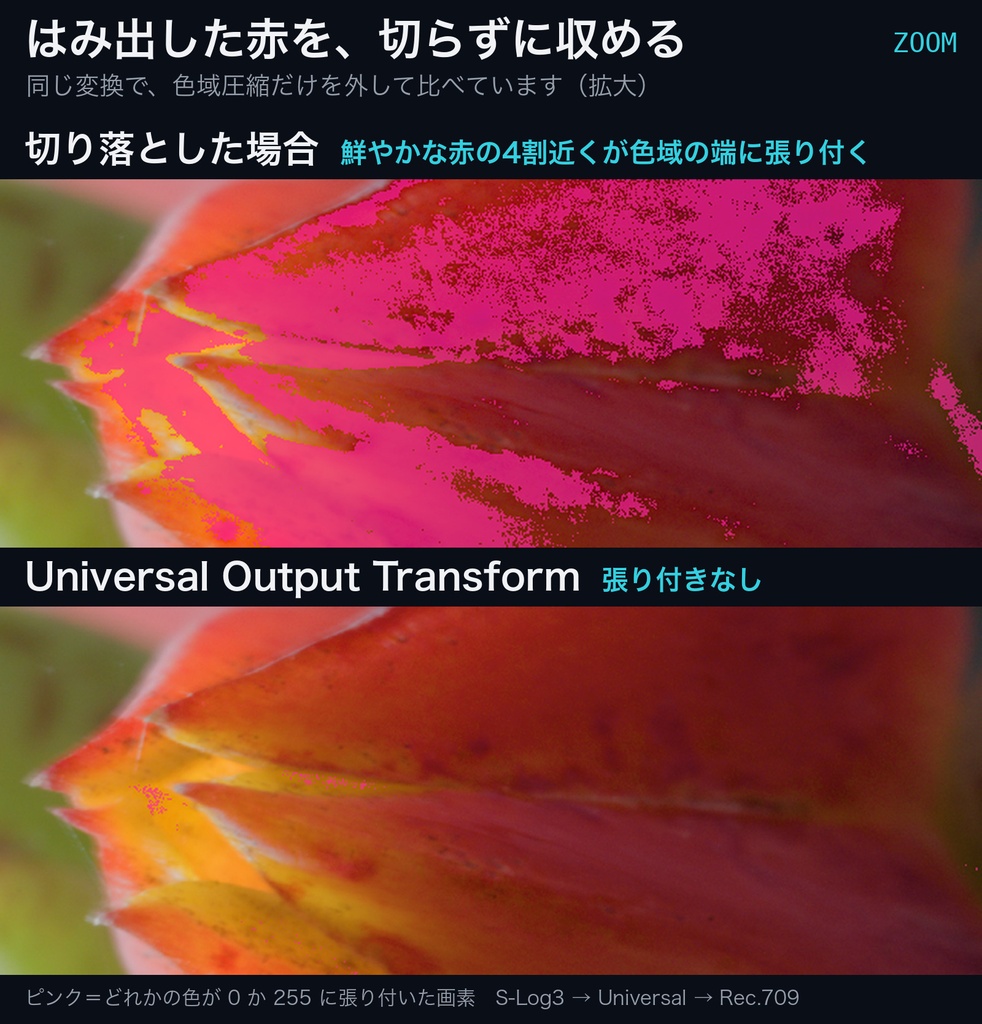
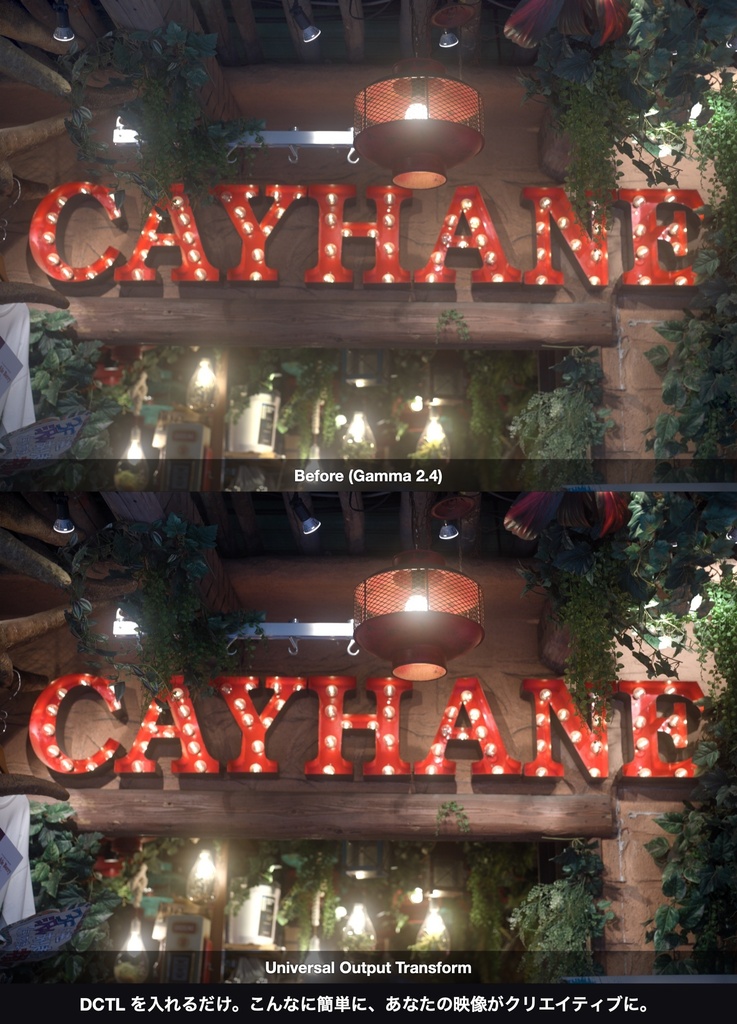
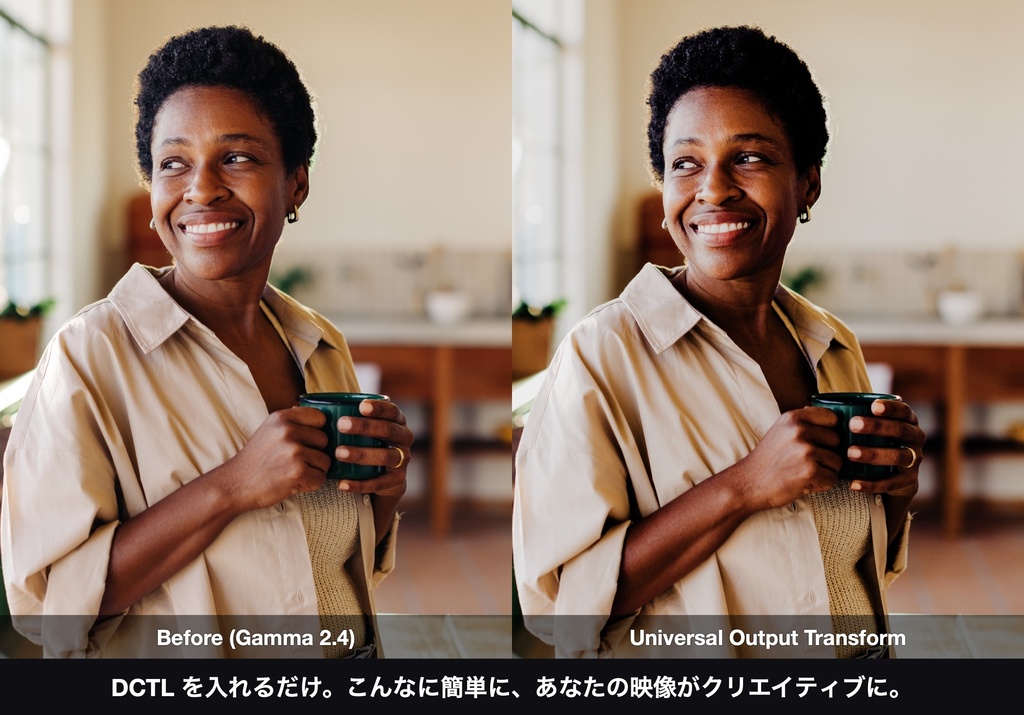
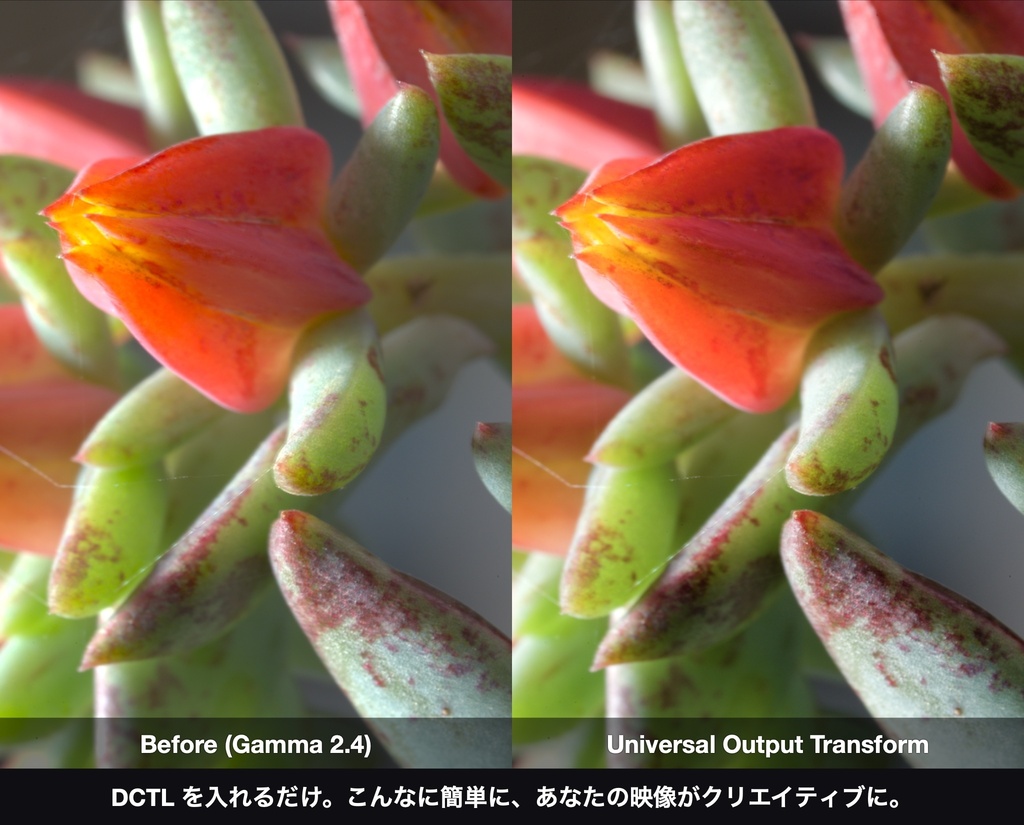
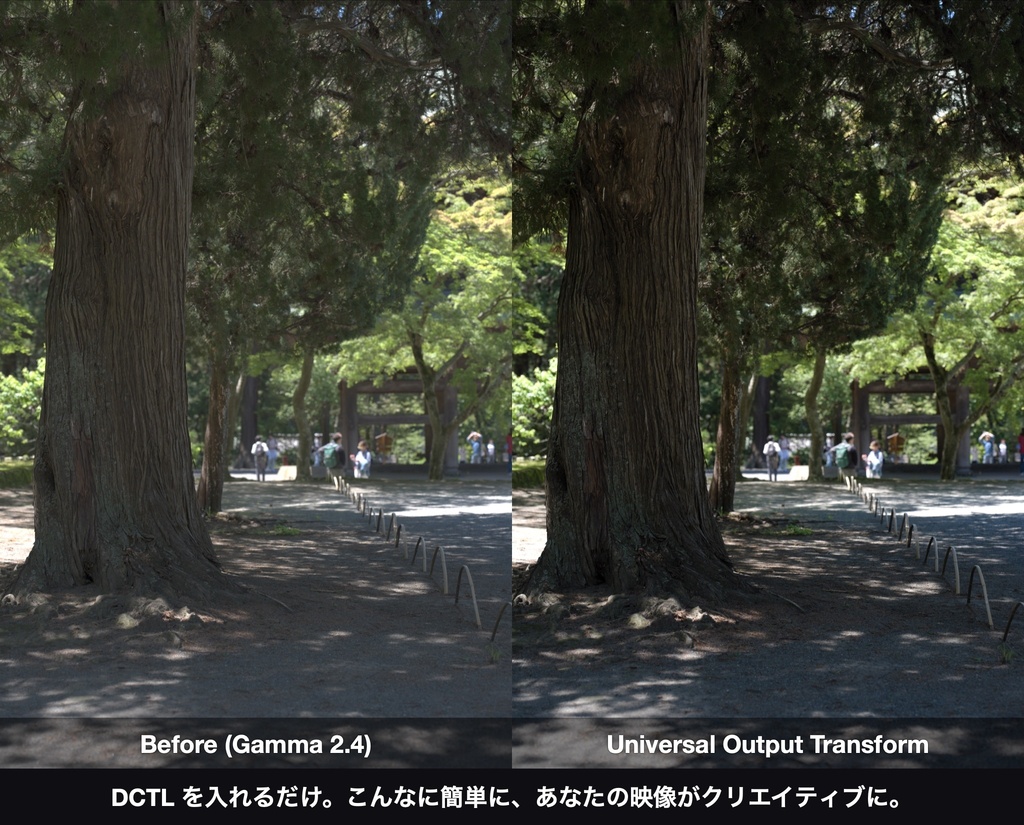
Universal Output Transform ほとんどのLogを、破綻させずに表示色域へ。 ■ これは何か カメラのLog映像を、モニターで見るための色(Rec.709 など)へ変換する「出力変換」のDCTLです。 グレーディングの一番下に敷く土台になります。 ふつうの変換でいちばん困るのは、Logが持つ鮮やかな色が表示できる範囲(色域)からはみ出しているときです。 はみ出した分をそのまま切り落とすと、こうなります。 ・ネオンや空が単色のベタになり、階調が消える ・青が紫に転ぶなど、色相がねじれる ・ハイライトが急に硬く飛ぶ 「なんか色が汚い」「明部が耳障り」の正体は、たいていここです。 ■ 彩度を下げる道具ではありません この製品は、ACES 2.0 の出力変換で用いられている色域圧縮の考え方に基づいて、 はみ出した色を「切らずに、色相を保ったまま」内側へ収めます。 クリップした絵は、色が濃いのではありません。濃さの上限に張り付いて潰れているだけです。 圧縮をかけると、その部分に階調と正しい色相が戻ります。 並べた瞬間はおとなしく見えても、拡大すると情報量がまるで違います。 そして効くのは、表示色域からはみ出した色と、明るい飽和色だけです。 肌や中間トーンなど、もともと収まっている色はほとんど動きません。 画面全体の彩度が落ちることはありません。 圧縮量は Strength(初期値 0.5/0〜1)で調整できます。 0 にすれば従来どおり、上げるほど破綻が減ります。効かせ具合はご自身で決められます。 彩度を「演出」するのはルックの仕事です。土台の仕事は「壊さないこと」。 この上にお好みのルックを重ねれば、濃さは後からいくらでも作れます。 ■ 何が違うのか ・色域圧縮つき。レンジ外の色を切り落とさず、なだらかに収める。色相のねじれを抑える ・ほとんどのLogに対応。入力を選ぶだけで、カメラが混在しても土台を統一できる ・DCTLなので精度が高い。LUTのような格子の誤差がなく、レンジ外もそのまま計算される ・ノード1つで完結。重いカラーマネジメント設定を組まずに、表示変換の土台を作れる ■ 対応する入力(11種) ・Sony S-Log3 / S-Gamut3 ・Sony S-Log3 / S-Gamut3.Cine ・ARRI LogC3 / AWG3 ・ARRI LogC4 / AWG4 ・Canon C-Log2 / Cinema Gamut ・Canon C-Log3 / Cinema Gamut ・Panasonic V-Log / V-Gamut ・RED Log3G10 / REDWideGamut ・Fujifilm F-Log / F-Gamut ・Nikon N-Log / BT.2020 ・Apple Apple Log / Rec.2020 カメラが混在した現場でも、入力を選ぶだけで土台を統一できます。 ■ 対応する出力(8種) SDR ・Rec.709(BT.1886 / 100nit) ・sRGB Display(100nit) ・P3-D65(2.2 / 100nit) HDR(PQ) ・Rec.2020 PQ(1000nit) ・Rec.2020 PQ(4000nit) ・P3-D65 PQ(1000nit) ・P3-D65 PQ(2000nit) ・P3-D65 PQ(4000nit) HDRは輝度別に用意しているので、納品先のマスタリング輝度に合わせて選べます。 ■ パラメーターは3つだけ ・Source Camera … 入力するLogを選ぶ ・Strength … 色域圧縮の量(0〜1/初期値 0.5) ・Output … 出力先を選ぶ 迷う場所がありません。選んで、強さを決めるだけです。 ■ 使い方 グレーディングの一番最後、表示変換の位置に置きます。 [露出]→[ルック・光学FX]→[Universal Output Transform]→ 表示 まずこの土台で表示を統一してから、上にルックや光学FXを重ねる構成を想定しています。 ■ こんな方に ・カメラが混在する現場で、表示の土台を1つに統一したい ・飽和したネオン、空、LEDの破綻に毎回悩んでいる ・ACESの色域圧縮を、軽く1ノードで使いたい ■ 導入 1. .dctl ファイルを LUT フォルダに入れる 2. Project Settings → Color Management → Update Lists を押す 3. カラーページで OpenFX → DCTL をノードに適用し、DCTL List から選ぶ ■ よくある質問 Q. 彩度が下がりませんか? A. 画面全体が下がることはありません。動くのは表示色域からはみ出した色と明るい飽和色だけで、 そこはもともとクリップして潰れていた領域です。クリップは「濃い」のではなく「潰れている」状態なので、 圧縮後は同じ場所に階調と正しい色相が戻ります。強さは Strength(0〜1)で調整できます。 Q. ACESのワークフローを組む必要がありますか? A. 不要です。ノードに1つ置くだけで使えます。 Q. ルックと併用できますか? A. できます。この出力変換を土台にして、上にルックや光学FXを重ねる構成を想定しています。 ■ 動作環境 ・DaVinci Resolve Studio 18 以降 ・DCTLはStudio版の機能のため、無料版では動作しません ・macOS / Windows / Linux
English
Universal Output Transform Bring almost any Log into your display gamut, without breaking it. ■ What this is A DCTL output transform: it converts Log footage from your camera into the colours you actually view on a monitor (Rec.709 and others). It is the foundation you place at the bottom of your grade. The hardest part of any output transform is what to do when the vivid colours held in Log fall outside what the display can show. If you simply clip whatever falls outside, this happens: ・Neon signs and skies turn into flat blocks of colour, losing gradation ・Hues twist — blue shifts toward purple ・Highlights clip abruptly and harshly That is usually the real cause of "the colour looks dirty" and "the highlights are harsh". ■ This is not a saturation reducer Following the approach to gamut compression used in the ACES 2.0 output transform, this product takes colours that fall outside the display gamut and brings them inside — without clipping them, and while preserving their hue. A clipped image is not "more saturated". It is simply pinned to the ceiling and crushed. Apply compression and gradation, and correct hue, return to those areas. Side by side it can look calmer at a glance, but zoom in and the amount of information is completely different. And what it acts on is only the colours outside the display gamut and bright saturated colours. Skin tones, mid tones and anything already inside the gamut barely move at all. The saturation of your whole image does not drop. The amount of compression is set with Strength (default 0.5, range 0–1). Set it to 0 and you get the traditional behaviour; raise it and fewer things break. You decide how far it goes. Creating saturation is the job of a look. The job of the foundation is simply not to break anything. Layer any look you like on top of this, and you can build the intensity back afterwards. ■ What makes it different ・Gamut compression included. Out-of-range colours are eased inward rather than cut off, which suppresses hue twisting. ・Supports almost any Log. Just pick your input, and a mixed-camera project still shares one consistent foundation. ・Accurate, because it is a DCTL. No lattice error as with a LUT, and out-of-range values are carried through the maths intact. ・Complete in a single node. No heavy colour management setup needed. ■ Supported inputs (11) ・Sony S-Log3 / S-Gamut3 ・Sony S-Log3 / S-Gamut3.Cine ・ARRI LogC3 / AWG3 ・ARRI LogC4 / AWG4 ・Fujifilm F-Log / F-Gamut ・RED Log3G10 / REDWideGamut ・Panasonic V-Log / V-Gamut ・Nikon N-Log / BT.2020 ・Apple Log / Rec.2020 ・Canon C-Log2 / Cinema Gamut ・Canon C-Log3 / Cinema Gamut Even on a mixed-camera shoot, selecting the input is all it takes to unify your foundation. ■ Supported outputs (8) SDR ・Rec.709 SDR (100nit BT.1886) ・sRGB Display (100nit) ・P3-D65 SDR (100nit 2.2) HDR (PQ) ・Rec.2020 PQ (1000nit) ・Rec.2020 PQ (4000nit) ・P3-D65 PQ (1000nit) ・P3-D65 PQ (2000nit) ・P3-D65 PQ (4000nit) HDR options are provided per mastering luminance, so you can match the requirement of your delivery target. * These names are exactly as they appear in the product's dropdowns. ■ Only three parameters ・Source Camera … choose the Log you are feeding in ・Strength … amount of gamut compression (0–1, default 0.5) ・Output … choose your display target There is nothing to get lost in. Pick, then set the strength. ■ How to use it Place it at the very end of the grade, in the output transform position. [Exposure] -> [Look / Optical FX] -> [Universal Output Transform] -> Display The intended workflow is to unify your display with this foundation first, then layer looks and optical FX on top. ■ Who it is for ・Anyone working with mixed cameras who wants one consistent display foundation ・Anyone who keeps fighting breakdown in saturated neon, skies and LEDs ・Anyone who wants ACES-style gamut compression in a single light node ■ Installation 1. Put the .dctle file into your LUT folder macOS /Library/Application Support/Blackmagic Design/DaVinci Resolve/LUT/ Windows C:\ProgramData\Blackmagic Design\DaVinci Resolve\Support\LUT\ * Inside the LUT folder you may create any subfolder you like to keep things organised. 2. Restart DaVinci Resolve (or right-click in the LUT browser and choose "Refresh List") 3. On the Color page, apply OpenFX > DCTL to a node and pick it from the DCTL List Full instructions are in the included README_EN.txt. ■ FAQ Q. Will this reduce my saturation? A. Not across the image. What moves is only the colours outside the display gamut and bright saturated colours — exactly the areas that were previously clipped and crushed. Clipping is not "vivid", it is "crushed", so after compression gradation and correct hue return to those same areas. The amount is adjustable with Strength (0–1). Q. Do I need to set up an ACES workflow? A. No. Just place it on a node. Q. Can I use it together with looks? A. Yes. It is designed to sit underneath, with your looks and optical FX layered on top. ■ System requirements ・DaVinci Resolve Studio 18 or later ・DCTL is a Studio-only feature, so this does NOT work in the free version of DaVinci Resolve ・macOS / Windows / Linux ■ Language note Included documentation is provided in both Japanese and English. The Japanese licence text is the authoritative version.